Friday, February 28, 2014

Inspired by the Movies: Vicki the Silver-and-Gold-Digger from The Parent Trap (1961)

Parent Trap Thumbnail

When Pattern Review announced its "Inspired by the Movies" contest I was kind of stumped.  I have made a zillion costumes based on movie characters, but the requirement for this contest is that the final result *not* be a costume.  Which is a clever twist but was not inspiring me so much.  I was trying to think of contemporary movies whose style I liked and was really coming up blank.  TV shows, yes.  But movies?  Nothin'.

Then I was thinking about the yellow skirt I had planned and what I would wear with it and suddenly a little tickle in my brain reminded me of one of my favorite movies of all time:  The Parent Trap.  I prefer the 1961 version, but I will tell you that I also own the Lindsay Lohan remake and like it almost as much as the original.  I am not a purist.  Though it makes me sad to see her being cute and undrugged.

At any rate, I have watched this movie dozens if not hundreds of times, can recite every line along with the characters, still laugh when the cake gets stuck on the bird beak, and there it is in the middle:  Vicki's yellow suit with a silver top.  I love Maureen O'Hara's wardrobe, but have neither the hourglass figure nor the bullet bra to carry off her looks.  But Joanna Barnes as Vicki?  That I can do.

While reams of ink (to mix my metaphors) have been spilled on Maureen O'Hara's Maggie (here is a fabulous rundown of all her outfits), I couldn't find much on Vicki's costumes.  I assume this is partly because she's the villain and mostly because as a femme fatale she is a total fail.  The costume designer really was not giving us anything to work with in seeing Vicki as the seductive younger woman.  All her clothes are too big, hiding whatever figure she may have.  Her hair is gray grandma hair of the kind where you go to the beauty parlor to get it set once a week.  She mostly wears heinous suits--hardly the kind of attire that screams bedroom!

Hayley Mills's character calls her "very nicely put together" and Maureen O'Hara's character refers to her as "that plotz-faced child bride with the electric hips," and yet...no.  Nothing we see her in makes her look sexy.  I think it's a rather cheap trick on the part of wardrobe to make the villain unappealing visually as well as morally.

White Cowl Dress

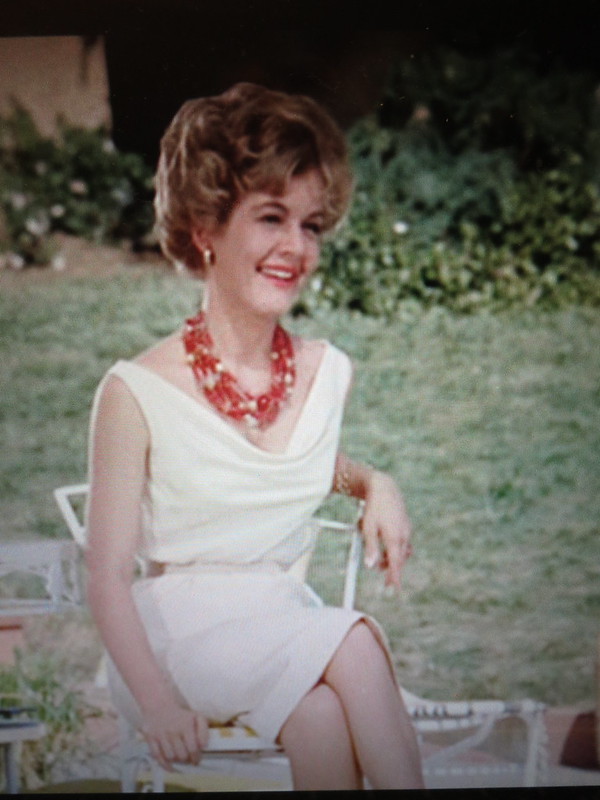
She first appears in her best wardrobe item.  It's all downhill from here, trust me.  She waltzes onto the scene in a fresh white cowl dress, the color suggesting bridalwear.  The fit is nice--not curve-hugging like Maureen O'Hara's clothes will be, but at least figure conscious.  The style is perfect for sitting pool(?--that thing always looked like a slimey pond to me)-side and trying to cozy up to the teenage daughter of your man-target.

I love that chunky necklace, too!

Chanel Style Jacket

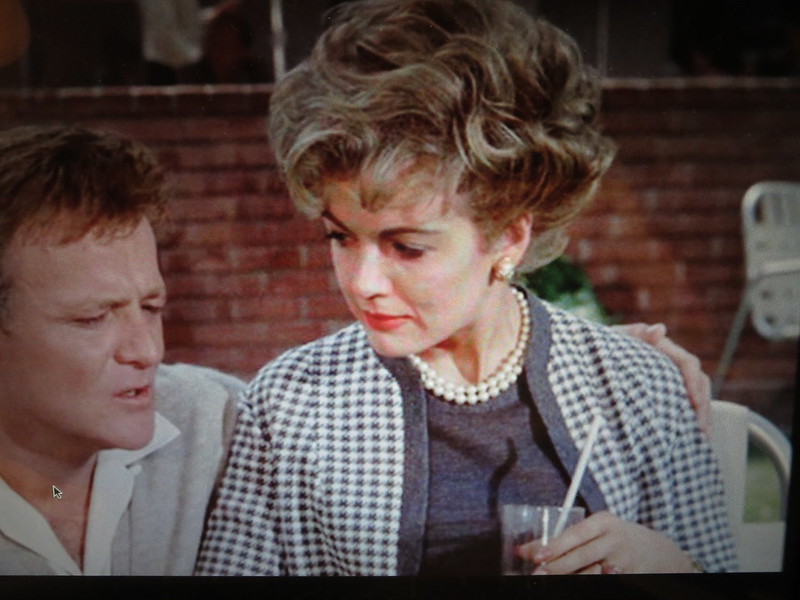
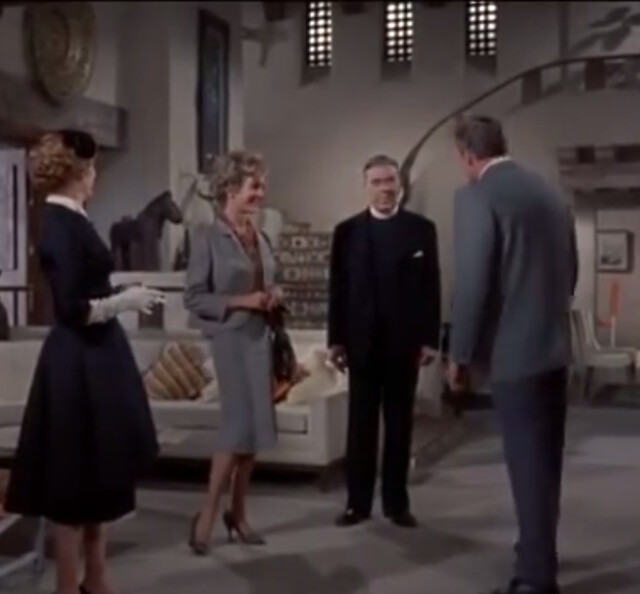
The next time we see her is at the country club.  She is seated the entire time so you don't get much of her outfit, but this is where she starts her run of suits.  This Chanel-style collarless checked jacket is nicely tailored and a good start, and it appears she is wearing a coordinating sheath under it.  OK, I guess she's trying to convey gravitas.  I get it.


Yellow Suit

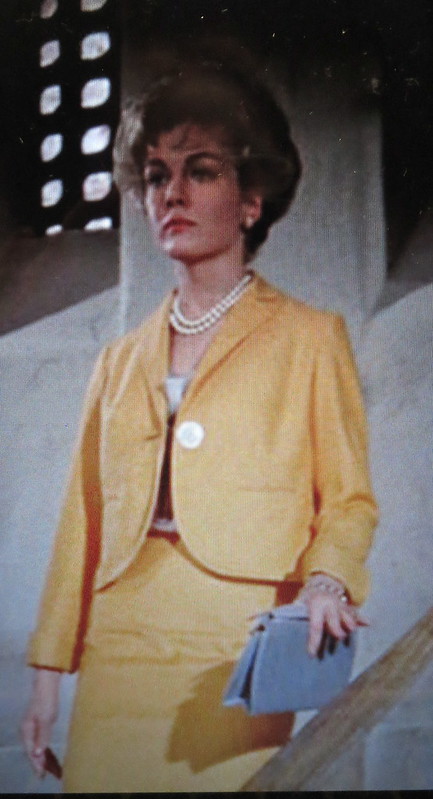
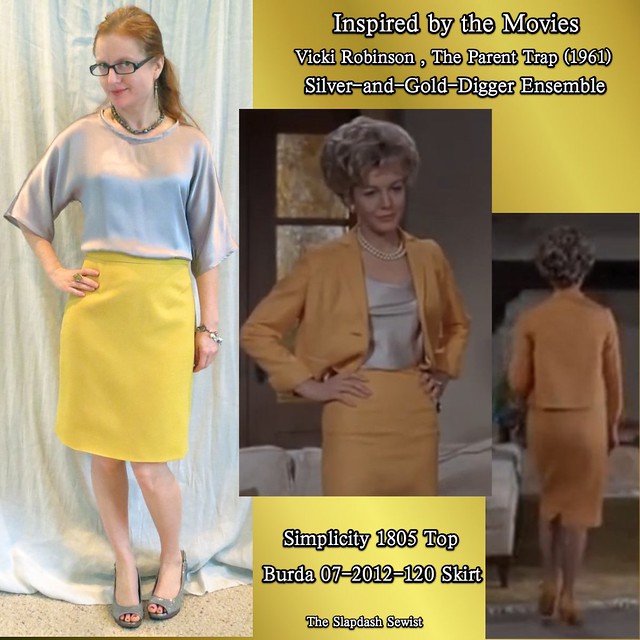
The next outfit is my inspiration, the Silver-and-Gold-Digger Outfit.  I don't know if that is what the costume designer was trying to convey, but I think these should have been her signature colors.  She was blatant about what she wanted out of life and from Mitch, she should have worn it on her sleeve!  This photo shows the matching silver purse.  The only place I could get her matching yellow shoes(!!!) was in the tiny fuzzy shot from the back.

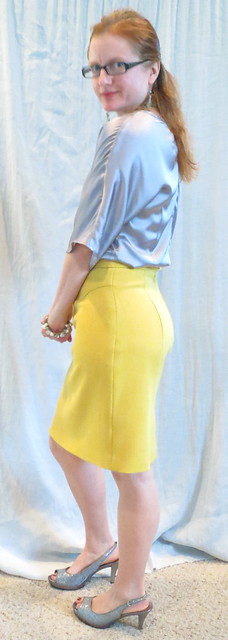
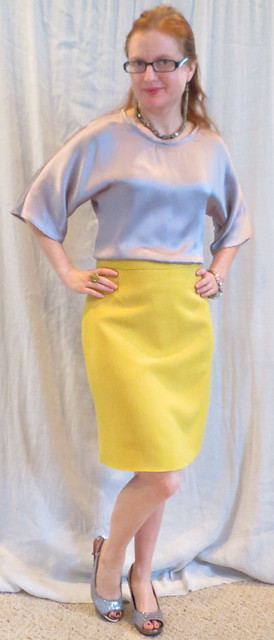
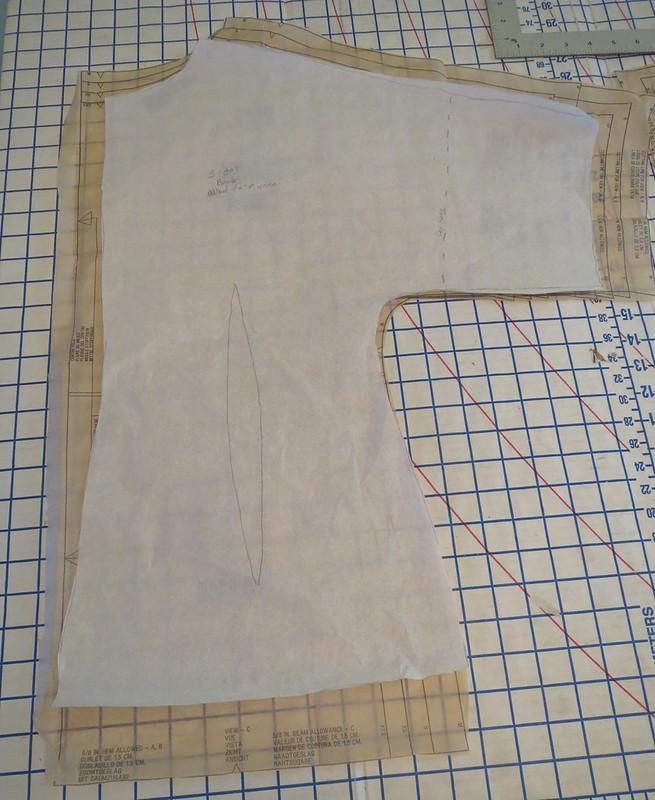
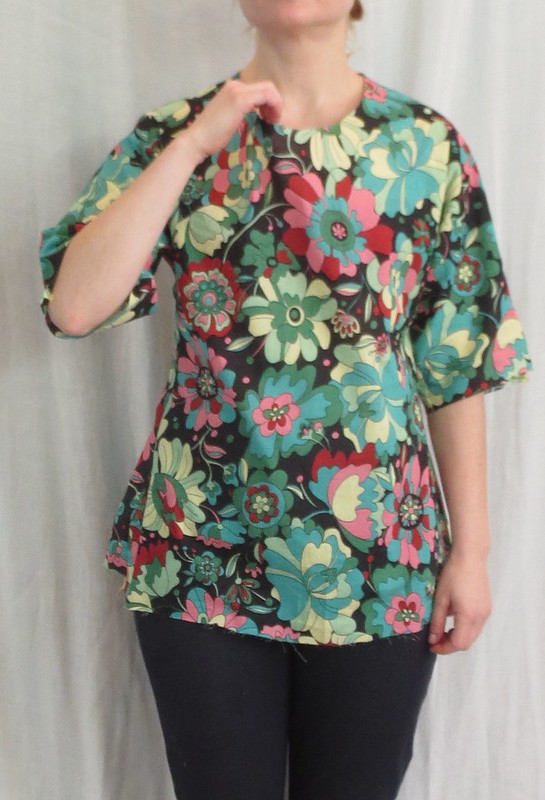
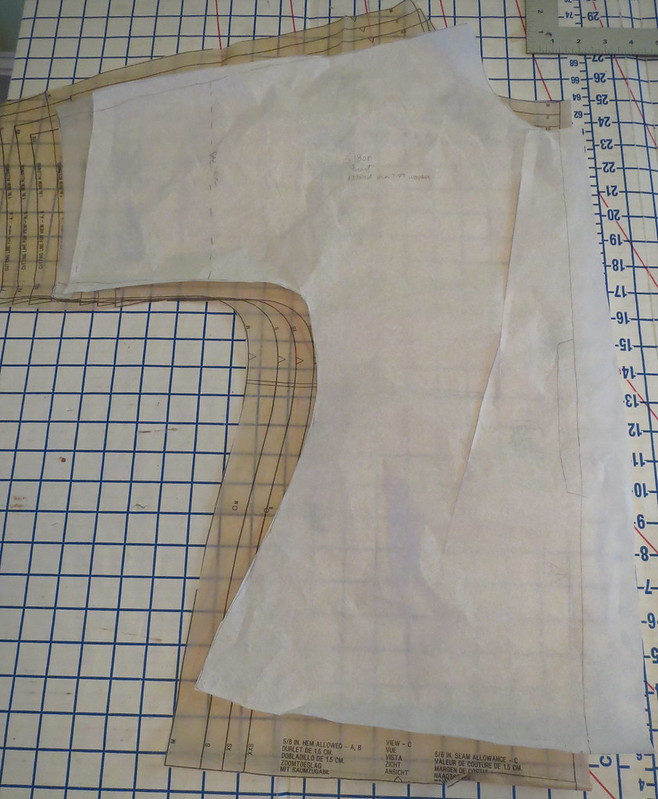
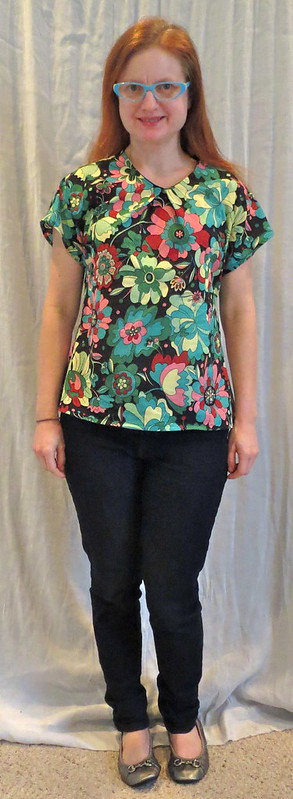
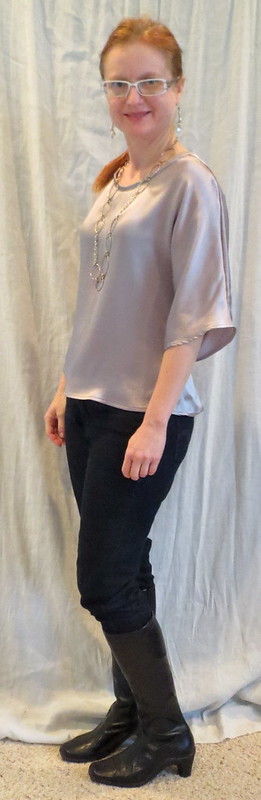
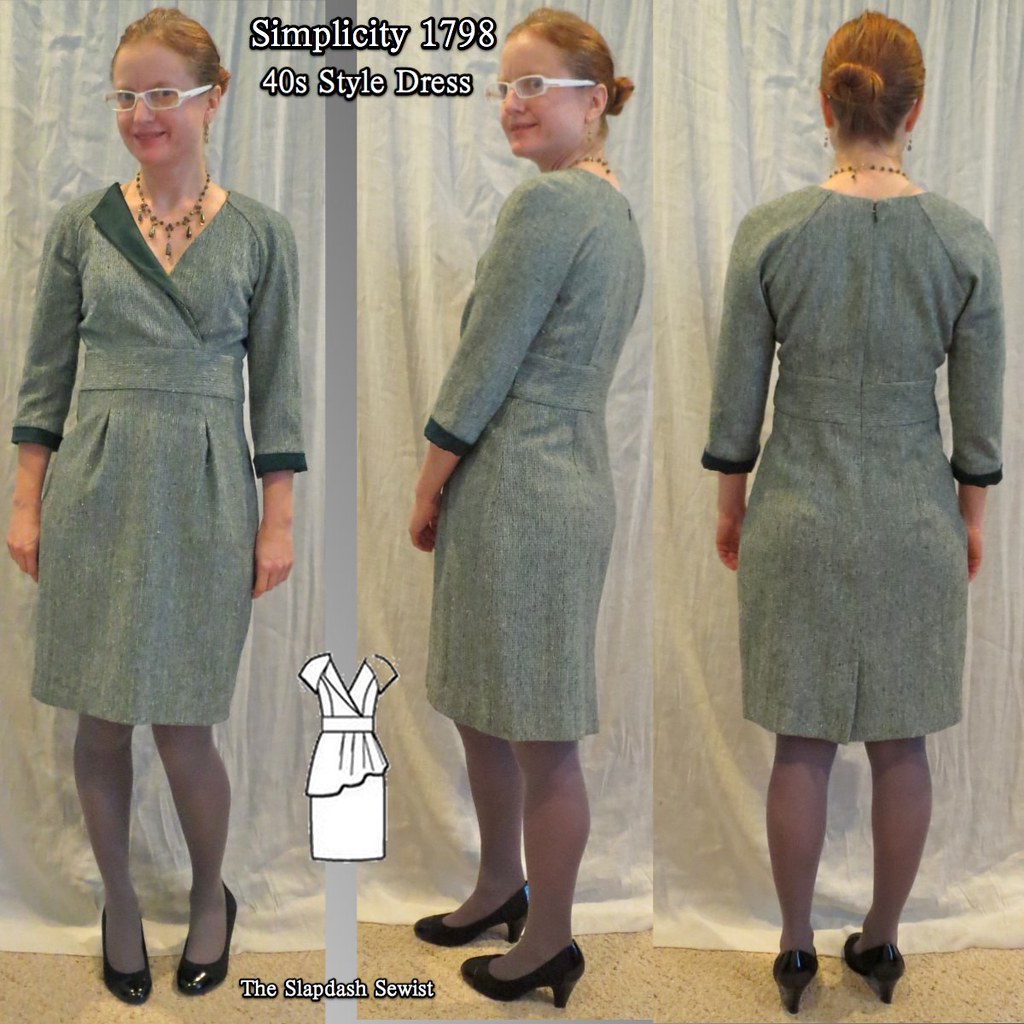
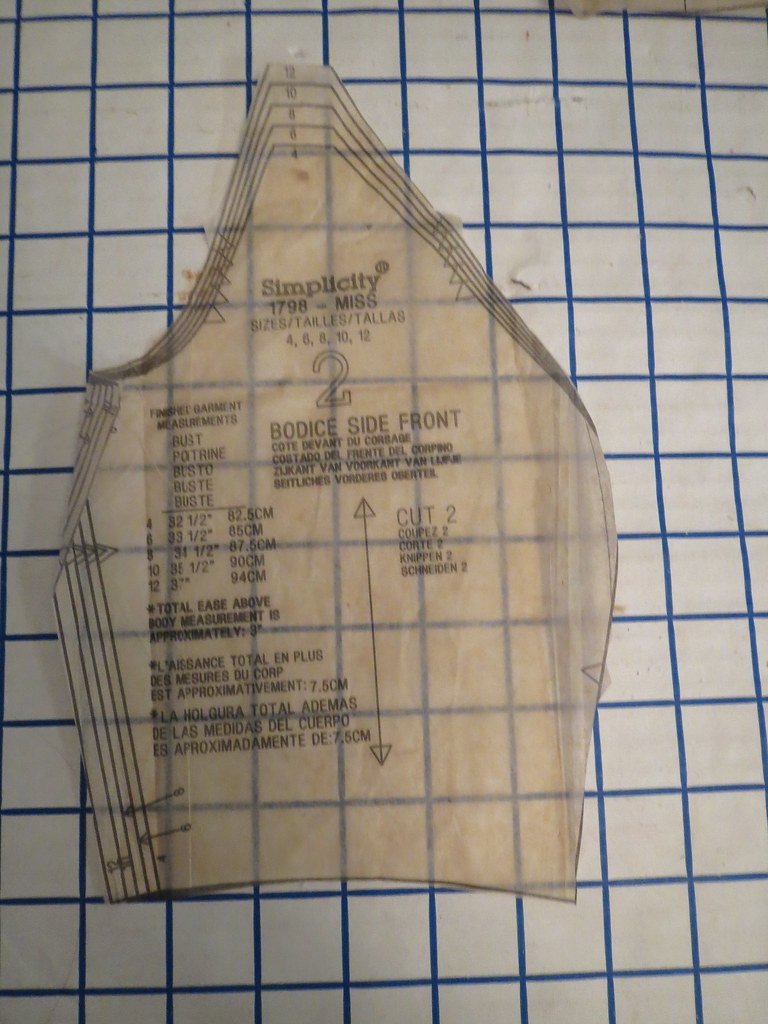
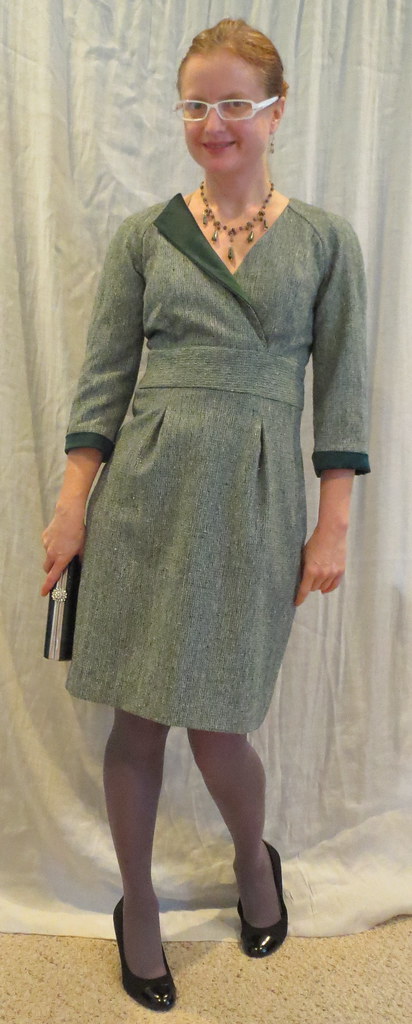
A yellow suit is a little much for my life, but a yellow skirt with a silver drapey top is just about right.  I went on a journey to find the right drapey top.  I didn't want to try to copy what she is wearing (not that you can see much of it), but to reimagine it for what a mid-level gold-digger might wear today (Mitch was wealthy, but he didn't seem *rich rich*).  I went with her method of alluring rather than showing off the goods, and adopted a very current silhouette in Simplicity 1805 (see all the examples in the S1805 blog post) that a woman in the fashion know--who is slightly clueless about how very little men care about what might be fashionable if it isn't tight and short--might wear.

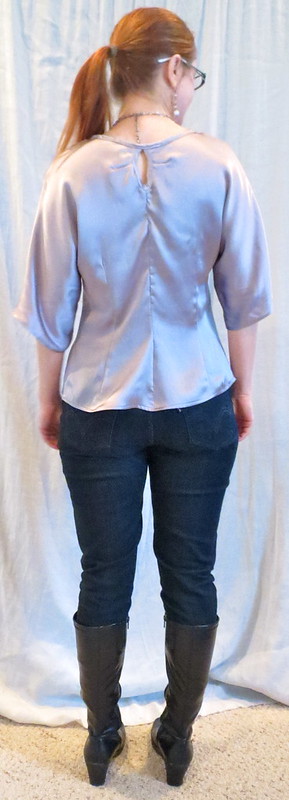
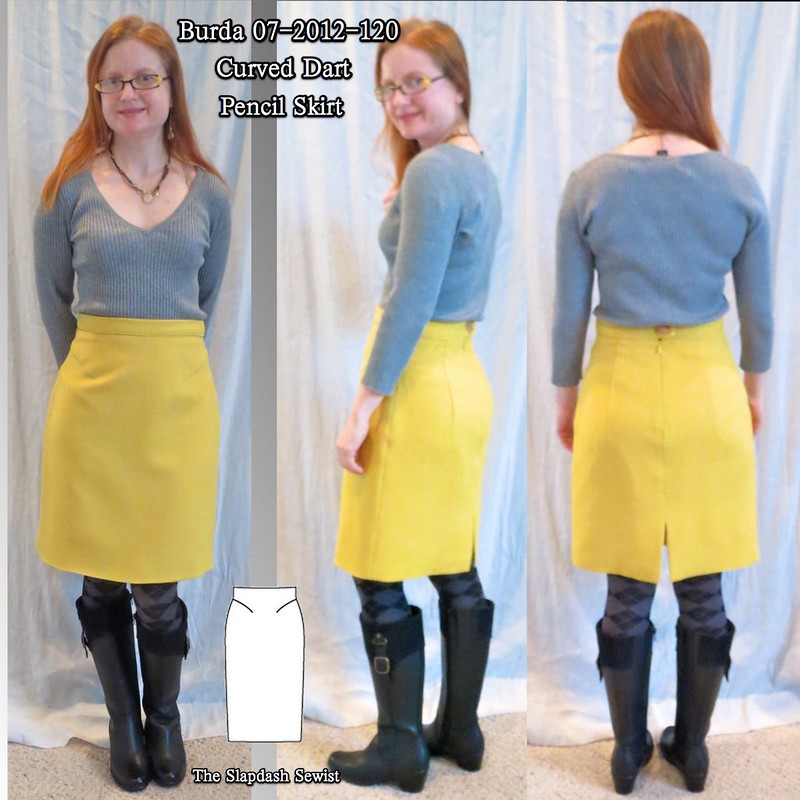
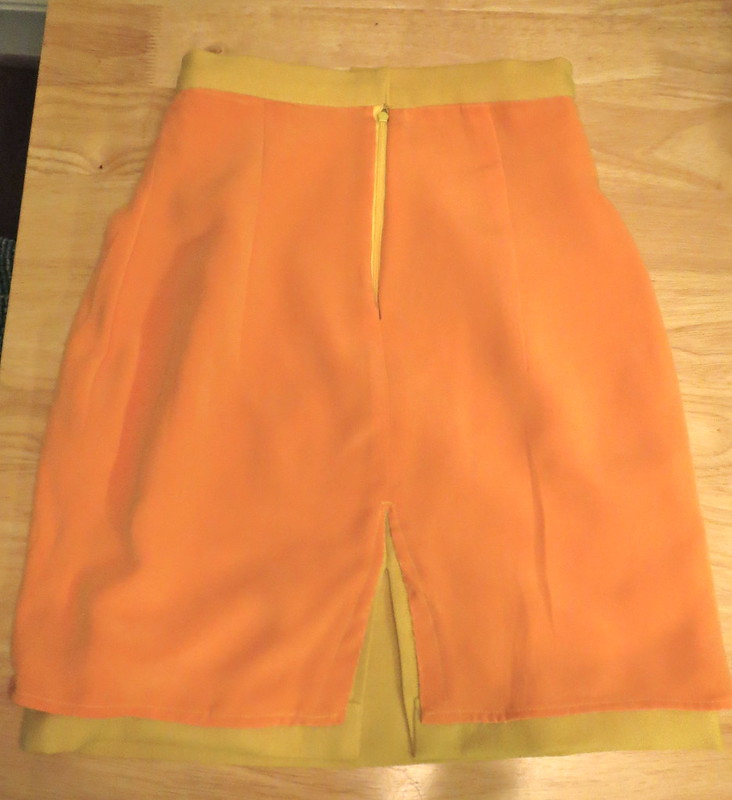
The skirt was a lot simpler to choose.  The pencil skirt hasn't changed much over the years!  Burda 07-2010-120 offered a nice version with the interesting dart variant.  I went with silver shoes instead of yellow--again, more current--and put on my best seductress face.  Luckily, I have a marketable skill and a good job because I am no better a seductress than she turned out to be.


Gray Suit


Here we have the nadir of Vicki-dom.  My heavens is this terrible.  She is at Mitch's house TO SET UP HER WEDDING and she is swimming in a dirge of a gray suit with a brown shirt under it.  Brown.

Her mother is sporting a fairly adorable naughty widow dress while Vicki is manning the guestbook table at the funeral.  Terrible.


Brown and Gray

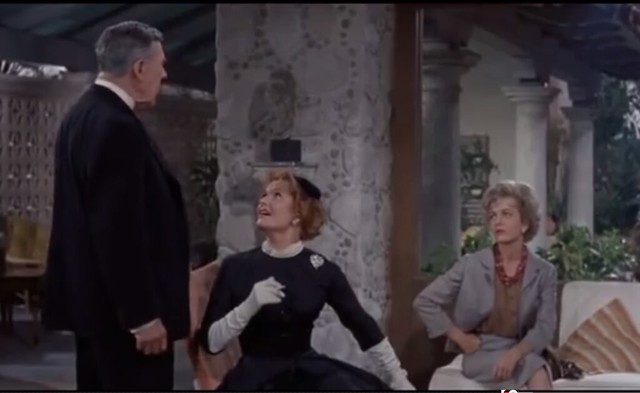
She does have a good necklace again, though.  I can't tell if it's same one she wore with her white cowl dress, but the two strand pearls she wears with the Chanel jacket and the yellow suit appear to be the same, so I think she is an unwealthy girl trying to stretch her wardrobe staples while she runs in wealthy circles until she can hit the jackpot herself.

But overall, costume designer, shame on you.  In this scene she is set up as a foil for Maureen O'Hara's adorable print dress with contrasting scarves at the waist, but they are not even going to pretend it's a contest.  Give a girl a fighting chance to live out her dream of a life of unearned leisure!


Vicki Pink

Realizing that dour suits are a losing proposition, Vicki attempts to bring on the feminine.  Except she went so far into feminine that she emerged as Easter Parade Matronly.  You thought it couldn't get worse than that suit?  Think again.

Vicki Pink Full Length


This polka-dot confection has tucks and fripperies galore to hide those "electric hips" and is an unflattering tea length.  Seriously, honey, you need to cut your fabric allowance in half for just about everything you wear, and this one is public enemy number one.

And where did that third pearl strand come from?  Mysterious.


Vicki Oversized


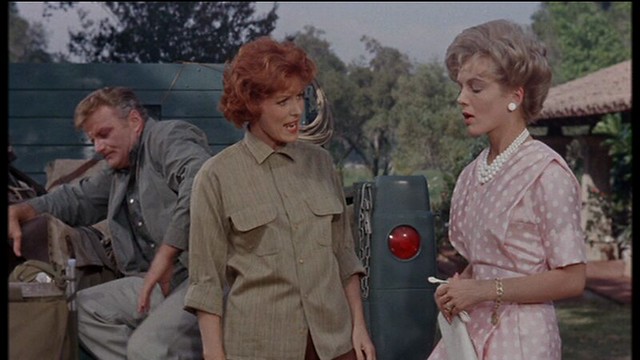
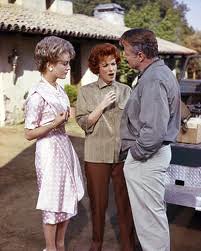
Not to worry, Maggie has her covered.  Literally.  When Vicki joins the camping trip on the fly, Maggie dresses her up in some of Mitch's pre-Weight Watchers items, telling her to "just cinch it."


Vicki Brown Closeup

She also managed to unearth another shirt in that most bridal of colors, brown.  Even so, Vicki is kind of working that cinch and the shirt is unbuttoned as low as she can reasonably go.  She's making an effort.  Then Maggie shoves her into a truck and waves goodbye.


Vicki Bandana

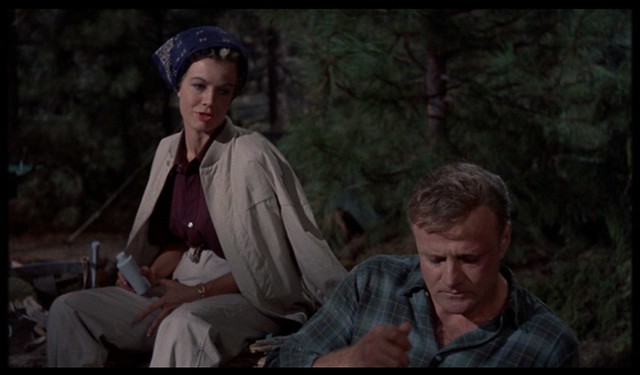
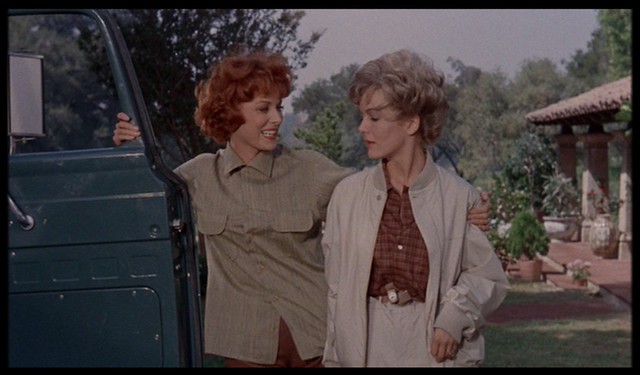
Although the camping trip is a disaster, she does manage to style that Members Only jacket in a fairly cute, preppy way by tossing it over the shoulders.  She also found a different shirt that is a deep burgundy and almost not-brown! Our girl is clawing her way back to youthful one muddy shade at a time.  The kerchief over the rollers is kind of stylin' too. She appears to have a lot of practice wearing them given how soundly she sleeps.  I take back what I said before about the beauty parlor; she has to DIY like the rest of us schlubs.


Vicki Curlers


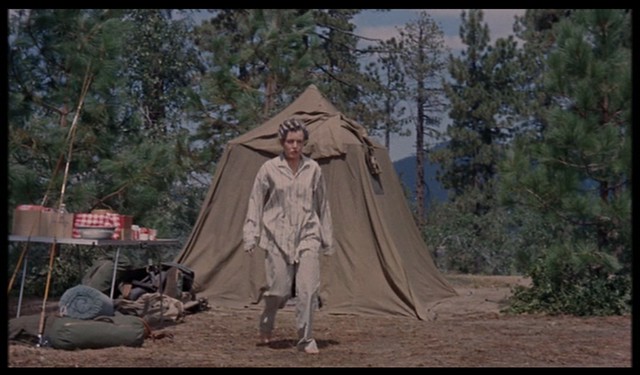
And here's our parting shot, she all fury and curlers and oversized men's pajamas that actually could be sexy in the right situation.  Two teenage girls, a grizzled farmhand, and a pair of motor-tongued bear cubs is not that situation.  Also, real bears licked her feet?  Or were those wooden stunt feet? I would not let real bears lick my feet, I don't care if they're bitty cubs that wouldn't hurt a fly.

Hecky gets her boots and she storms down the mountain to dig for new treasure.  I hope for her sake that she ran so quickly she left her wardrobe behind and had to get by with a well-cinched pair of men's pajamas.  Cut those pants into shorts and unbutton a few extra buttons and you have a sort of adorable variation on a salwar kameez.

Side
Electric hips?
Front

Actress Joanna Barnes was a good sport in all this, and even reprised her role in the Lindsay Lohan remake as "Aunt Vicki," the mother of actual, if still unsuccessful, femme fatale Meredith Blake (played by Elaine Hendrix), who gets to wear actual attractive clothes.  I assume Joanna privately sneered at her as an amateur.  Anyone can work with a fitted sheath.  In her day you had to make a pastel polka dot HeeHaw reject dress look good!

Vicki, I salute you.

You can see the full album here and my pattern review contest entry is here.

=====================

Three posts in one week!  I'm sure you can guess the contest deadline is today.  Ha!  I have been spending *a lot* of time at work on a big project, but I don't want to give up my real life to do it.  I am glad I don't have to do any more late night blogging, though.

And I've been so busy that I haven't told you that Cidell and I finally did another podcast! You can find us on iTunes, too.

Thursday, February 27, 2014

Simplicity 1805, Silk Dolman Tee

S1805 Thumbnail

One of the things I've been meaning to get into my wardrobe is a pullover top with a cut on sleeve.  It's a dolman top, so how hard can it be?  But I've been too lazy to draft my own, so when Joann had Simplicity at 5 for $5, I picked up Simplicity 1805.  Had it been $2 I wouldn't have gotten it.

Zooey Deschanel in Derek Lam
It turned out to be fortuitous because I got a haircut the next day, which is a whole other conversation, and while I was waiting I picked up the Lucky magazine they had out and was instantly enchanted with this dolman top on Zooey Deschanel.  It's Derek Lam, and I just love how the simplicity lets the fabric be the star, and the perfect proportions.  And I already had the pattern!  The "Eh, it's only a dollar, it's ok if I end up giving it away" pattern was muslined and earmarked for a fabulous silk within 24 hours!

This has been a popular style with designers for several years.  There are plenty more examples out there, like this Michael Kors satin top ($542) and this Rachel Comey from Fall/Winter 2012.  The silhouette seems simple, but if you make it in a high-end fabric it drips luxury.

Back Pattern

Before cutting, I used my TNT pullover woven top pattern to determine the side seams, add a center back seam, and add darts in the back.

The back neckline was seriously, seriously wide.  Here is my final pattern laid over the drafted pattern.  And keep in mind that my final pattern has a center back seam, so the cut edge of the tissue is not even the seam line!  I normally have to narrow the back neckline of commercial patterns a bit, so I didn't think too much of it other than remarking at how ridiculously wide it was drafted.

Gaping Neckline


I actually muslined this *gasp.*  Although it is a wearable muslin.  When I sewed up the muslin I realized I should have had an inkling there was something going on with the front neckline too.  There was *serious* gaping at the front neckline.


Inverted Pleat to Take Up Excess Width


As a slapdash fix to the muslin, I took up 2 1/4" inches total in an inverted pleat at the center front neck.  I swear they rotated the bust darts to the neckline but then forgot to remove the excess width.  I don't see how this would work for anybody.

Front Pattern


You can see the dramatic change in my final front pattern where I folded out that gape!


After my muslin, the additional changes I made were to increase the width of the sleeve opening to match my inspiration, cut it to the length of the TNT (the tunic length just doesn't work for me), add a keyhole opening at the center back neck, and correct for sloping shoulders by shaving a slight amount off the shoulder edge from a few inches out from the neckline.  The muslin was sticking up a little at the neck edge of the shoulders.


Floral Front


When I was done getting all the information I needed from the muslin I chopped the sleeves short.

This is an airy cotton batiste ($3/yd on our Pilgrimage to Fabric Mart) that will be nice to wear in summer.  

And designers haven't left the short dolman sleeved top in the cold--check out this Reiss silk top for $210.

With the pattern altered and it being two fairly unshaped pieces, the silk version was...not a breeze.  I was using a silk charmeuse from Paron, puchased last November; it was $15/yd, but with a Groupon I ended up paying an average of $5/yd for several silks.  A steal!  As beautiful as it is, though, silk charmeuse is just fussy to sew with.

Back


I used French seams, which makes for a lovely inside, but I am severely disappointed with the puckery back seam.  For some reason, although it has perfect tension on regular seams, my machine cranks up the tension when I sew the second pass of a French seam.  I honestly have no idea how the machine can "tell" that's what I'm doing, but I have to actively stretch the fabric from both sides of the presser foot to get a smooth seam and I clearly didn't stretch enough for the CB seam.  I am loath to unpick it because silk does not recover from needle holes and I'd rather live with a puckered seam than a shredded one.  Does anyone know why this happens?


Sew Bias Take to Wrong Side

For the back keyhole opening I first cut a shaped keyhole and staystitched it.

Next, I stitched self bias tape on the wrong side, right side of bias tape to wrong side of blouse.

Fold Bias Tape to Right Side


Once the first pass with the bias tape was sewn, I pressed the bias tape over to the right side and pressed under the remaining raw edge.


Hand Tack Upper Keyhole Edges Together

Next I topstitched that folded under edge in place, and steamed steamed steamed to get it as flat as possible.


Finally I hand tacked the neck edges together to complete the keyhole--this is just decorative, I did not need a slit to get it over my head.  Then I bound the neck in a continuous bias piece.


Completed Back Keyhole

Before binding the keyhole I made two tiny horizontal darts.  Because of my "forward head" (aka bad posture), I sometimes get gaping at back slit openings and I didn't want that.  I don't know that the darts were totally necessary, but they made me feel better.

Hair Clips to Mark Hem


Marking the hem on silk is a pain because pin holes.  I have a couple of packs of hair clips for millinery and was like, duh, use clips to mark the hem!  It wasn't quite as easy as using pins, but I got a reasonably straight hem considering I am working with silk charmeuse here.

Sleeve and Lower Hems


I decided to do a regular stitched hem for the sleeves and the lower hem.  I normally do a blind hem or a twin-needle hem, but somehow the stitched hem seemed right for the style.  I think it works.

Side


All the care taken on this simple top was worth it for the end result (other than that stupid center back seam, ugh).  It is as luxe and classy looking as I'd hoped, and looks and feels high end.  I have some dressy events coming up and I feel pretty confident this will be making an appearance at least once in the next couple of weeks.

All photos are here and the pattern review is here.


Wednesday, February 26, 2014

Burda 07-2010-120, Curved Dart Pencil Skirt

Burda 07-2012-120 Thumbnail

I had a fairly small piece of this Fabric Mart yellow wool crepe (purchased in October 2010 for $9.99/yd) leftover from a dress that I made last winter (and haven't blogged about because I want to change the skirt from dirndl gathers to darts but haven't).  I couldn't make my usual A line skirt so I looked for an interesting pencil skirt pattern.  The curved darts on Burda 07-2010-120 and I decided to give it a shot.

The dirty little secret nobody talks about with wool is that it wrinkles as much as linen, maybe more.  Or maybe this doesn't happen to anyone else?

Hand Sew Organza to Dart

To try to keep the wrinkling under control (I sound like I'm talking about my face, ha!), I decided to underline the skirt in silk organza.  For the back, I treated the organza and wool as one at the darts, sewing them together.  However, for the front darts I wanted to take maximum advantage of wool's moldability with steam.  Getting those darts flat was going to be crucial to making a flattering skirt, versus one that had two prominent arrows pointing to my belly.

So I stitched and pressed the darts in the wool and the organza separately, and then lightly hand sewed the organza layer to the wool at the dart.  I treated them as one at the side seam.

Fold Out Dart

For the lining, I wanted a traditional vertical dart coming from the front waist--I didn't want to risk adding a third layer of curved dart to this scenario.  This involved rotating the dart.  First, I marked where the vertical dart should go.

Next, I folded out the curved dart.  This created a bubble that needed to be released.


Rotate Dart to Vertical

Finally, I cut along my marked vertical dart line and let the tissue naturally open for the dart width.  I measured to be sure, and the vertical dart width was the same as the curved dart.  Normally, you would have cut along the new dart line before folding out the old dart, but here the vertical dart crossed where the curved dart had been and it wasn't possible.

The lining went in well and fits perfectly, so I think it worked!

The back darts are drafted very long.  I decided to give it a go and they surprisingly work.  Usually darts that are so long they go to or past the apex bubble or poke out at the end, but these sit very smoothly in the side and back view.  Somebody knew what they were doing at the drafting table.

Shape Center Back Seam

I often have a problem with straight and pencil skirts sticking out at the back hem--the most extreme example recently being Vogue 1329--but I never really understood why until I read this blog post about cylinders.  Ding ding ding!  Prominent buttocks cause a skirt to swing the back, and heaven knows I have those.  I need to do more work to find the right curve, but for this project I just shaved a little off, starting at the booty apex.  The fit along the CB seam is not perfect, but I think it is improved over a straight seam.


Close Coin Pocket

Even with this change, the back vent was not sitting flat and smooth, so I weighted the corners with a Swedish 1 Kroner coin on each side.  I took advantage of the organza layer to hand sew a "pocket" invisible from the outside.

Coin for Weight


I slipped the coin in before completing the pocket by hand closing the vertical seam allowance at the vent.  They hit the back of my legs when I walk, not in an uncomfortable way but in a noticeable way.  I probably should have used smaller coins, but that slit stays where it's supposed to!


Contrast Lining


I lined it with a silk crepe, this fabric that I had dyed orange a while back.  The orange wasn't rich enough for my taste, so lining was the obvious choice.  I love the way the two colors look together, though I was craving Rainbow Sherbet the whole time I was making this!

I would not use silk crepe for lining again.  Once it's in place, it sits well and it didn't ride or creep against my tights or inside the skirt (which I had been afraid of).  But when getting dressed you have to be careful to keep the lining perfectly smooth and if it rumples the only way to fix it is to take the skirt entirely off and start over.


Hand Sewn Hem


In addition to invisibly hand-stitching the hem to the organza layer only, I hand-stitched the lining to the skirt at the back slit and for a couple of inches along the back hem from the slit to keep it from peeking through.


Decorative Button


This skirt is drafted to sit above the waist, finished with a facing.  I find skirts without a waistband difficult to wear.  I really can't figure out how to tuck into a skirt with a facing.  So I added a straight cut waistband.  It closes with a snap above the zipper, but it was looking big and bulky there.  I did some random hand stitches to compress the layers and added a decorative button on top.


Front


These photos were taken in the morning on an empty stomach at its flattest for the day and the skirt looks great.  I don't totally love the look on the abdomen when I have, you know actually eaten, but it is not as unflattering as I feared it had the potential to be.  It is also oddly binding at the upper thigh, though it doesn't impede movement.  I don't think I'll be making this pattern again, but I'm glad I gave something new a try.

All photos are here and the pattern review is here.

Thursday, February 20, 2014

Simplicity 1798, 40s Inspired Surplice Dress with Single Collar

S1798 Thumbnail

Simplicity 1798 is a Project Runway pattern, so it has all kinds of crazy options, but one of the illustrations shows the surplice bodice with a collar only on the outer half of the bodice.  Pleasing asymmetry is ridiculously difficult for me to envision, but since they had done the work for me it caught my eye. I used a wool from The Carol Collection and accented it with one of the Vera Wang silk/rayon blends from Fabric.com's $1.99/yd blowout in January 2010.  Coupled with my $1.99/yd Fabric Mart lining, this dress is a lot of bang for very little buck.
I started the alterations by shortening the skirt 2 inches, and still had a very generous two inch hem allowance.  I've shortened it another 3/4" for the next time.

Shave Off Curve for SBA

The side front bodice is *very* shaped.  I shaved off a bit of the curve for my small bust before sewing and it fit fine around the curve of the bust.  However, it was quite puffy above the bust.  I mean, I'm not saying they're where they were when I was 18, but they are not that low.  So beware that the fullest part of the pattern may not be at the fullest part of your bust.  I resewed the seam 1/4" deeper (for a total of 1/2"removed) from the fullness of my bust, tapering to nothing at the armscye.  The bust is still a squidge generous for me, but it is not noticeable to even a close observer.  I also shortened the front crossover for my small bust to prevent gaping.


Split Swayback Adjustment Between Bodice and Skirt


So as not to narrow the midriff, I split the swayback adjustment between the bodice and the skirt.  I ended up with a really nice fit.

The fabric is really interesting.  On one side the weave shows horizontal stripes, and on the other side it shows vertical stripes.  I suspect that the horizontal stripes is the "right" side, but I preferred the vertical stripes for elongation.  I used the horizontal striped side of the fabric for the midriff, to increase the hourglass illusion.  It's quite subtle, though--I doubt anyone will ever notice!

The only thing I don't like about a surplice bodice dress is that you can't line it in the traditional way.  The neckline must be finished and the bodice before attaching to the midriff/skirt, as the front bodice pieces overlap.  Normally, I just treat the bodice lining as flatlining at the center back zipper in this instance.  It's not beautiful but it works.  But this wool is somewhat scratchy, as it's more of a jacket texture than a dress texture, and I didn't want to risk having it irritate my skin.

I started by constructing and lining the bodice, stitching the lining to the neckline.  I had cut facings out of my fashion fabric, but decided that with the bulk and scratchiness I would just line to the edge.  I pressed it so that the fashion fabric overlays the lining by a good 1/8".

Grade Layers at Zipper Intersection

Sewing the lining and zipper presented some challenges.  First, this fabric is almost coat weight (and is certainly jacket weight).  I strongly prefer invisible zippers, but thick seams are a challenge for them to get through.  I severely graded my seam allowances at the midriff bodice and skirt seams.  Thank goodness it worked!

Leave Lining Free of Fashion Fabric at Midriff


Then came the challenge of lining. 
When sewing the bodice to the midriff, I layered as per usual:  The finished bodice with the fashion fabric and lining wrong sides together, midriff fashion fabric right sides with bodice fashion fabric, and midriff lining right sides with bodice lining.  I sewed this 4 layer sandwich to within 2 inches of the center back.  Then I separated the lining layers from the fashion fabric layers, and stitched the fashion fabric seam all the way to the end of the fabric at center back.

Lining Free From Fashion Fabric at Midriff

Then I separately completed the seam on the lining.  I turned the zipper opening edges of the lining in at the 5/8" seam allowance.  So the last two inches or so of the lining is free from the midriff seam allowance, but mostly the lining and bodice are sewn as one at the waist seam.

The skirt/midriff seam is sewn completely separately for the fashion fabric and the lining so that the lining hangs free.

Hand Stitch Lining to Zipper


After the dress was fully constructed, I turned the lining under at the center back seam, pinned over the zipper, and hand-stitched in place.  It looks like a real lining, even though it isn't (in the sense of not being an entirely separate dress joined only at the outer edges).


Hand Stitch Lining to Cuffs

I wanted to bring the satin accent in somewhere else, in addition to the collar, so I added cuffs.

To keep the sleeve lining in place, I hand stitched the sleeve lining to the cuff seam allowance.


Front


I'm not sure this dress photographs as well as it looks (or at least as well as it feels), but it is sensational.  I love the vintage vibe, the single collar is a great detail I never would have thought of had Simplicity not illustrated it on the envelope, and the fit is incredibly spot on.  I can hardly believe this is a Big 4 pattern given how well it fits.  I feel very confident when I wear this for professional occasions--it is both totally my style and appropriately dressy, which is a hard combination to find.

All photos are here and the pattern review is here.