Tuesday, January 31, 2012

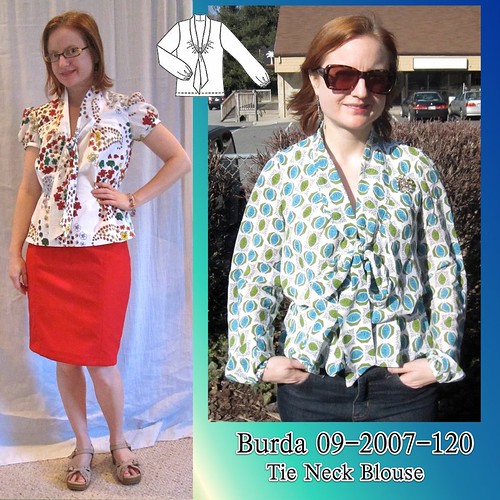
Burda 09-2007-120, Tie Neck Blouse

Burda 09-2007-120 Thumbnail

Several years ago, I think in 2006, I answered an ad on Craigslist for fabric.  It was a woman who ran a vintage store.  At one point, they had made tote bags to sell but she had apparently burned out on making tote bags.  She had collected a *lot* of fabric to that end (ah, how I know about collecting fabric).  Most of it was junk and/or not to my taste, but I picked out a few pieces.  The prize length was this groovy 1970s turquoise and green print.  There were 2 yards of very narrow fabric, and I could never find the perfect pattern.

After my pants muslin disaster, I needed a trusty old faithful project.  Plus, January is the Pattern Review stash contest, which I like to use as a challenge for sewing up older pieces.  So I made a skirt (to be revealed soon).  But then I realized that I only had a couple tops to match it.  So I went stash diving and came up with this prized vintage fabric, that I had actually forgotten about, I admit. 

MARC BY MARC JACOBS Top - Hot Dot Print, $228.00


In considering patterns I found Burda 09-2007-120.  At first I was torn because the pussybow blouse has been having a looong moment and I didn't want to make something instantly out of style.  The trend is still going strong, as you can see in these two pieces from Bloomingdales, but I just knew I would give it the kiss of death.


Rachel Zoe Long Sleeve Plunge Tie Collar Blouse $295.00


But the more I thought about it, I realized that the fashion aberration is actually when the pussyblow blouse is *out* of style.  It was standard office wear for women from the 50s through the 80s in various incarnations.  It was only the 90s through early '00s that it was out of fashion, though admittedly it was desperately so during those decades.  I don't have a classic example in my wardrobe (only two high-neck side-tie variations, Burda 02-2008-119 and McCall 5708) so I decided to take the plunge.

The pattern is drafted for jerseys.  It looked to be drafted with enough ease to work in a woven, possibly with a zipper under the arm, but I wanted to test it out first before cutting into my precious fabric.  I ordered the cotton floral paisley lawn from Fabric.com in May 2010 and was extremely disappointed when it arrived.  I thought the paisleys were small, but they are huge!  Also, I thought the color scheme would be more on the orange/yellow/red side, but instead the most prominent colors are Christmas red and green. So I figured no great loss if the cotton lawn version didn't work out, and the fabric would be out of stash either way.
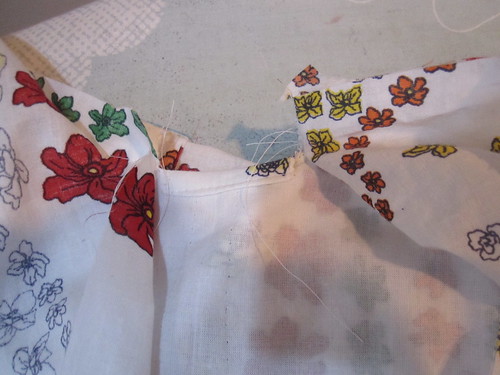

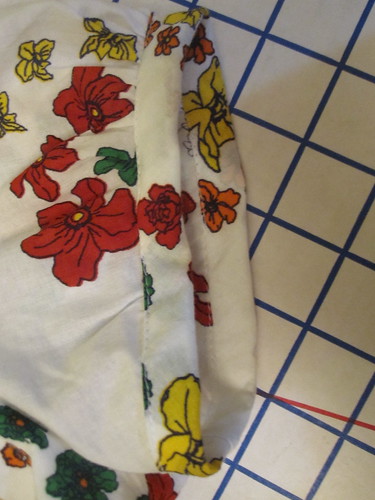
Turn Under Center Front (Inside)

The reviews flagged two things.  First, the neckline is way way WAY low, even for Burda.  I raised it an inch, which was about perfect for the cotton lawn version but not quite enough for the lighter-weight vintage fabric (it's some sort of semi-sheer nylon).

The second thing is that everyone mentioned the directions for the tie neckline are extremely confusing.  So I didn't even bother to read them and just did it my way.

First, I clipped into the seam allowance at the markings on either side of center front and turned and stitched down the fabric to finish that short edge, as seen at left.  Here's what it looks like on the outside.
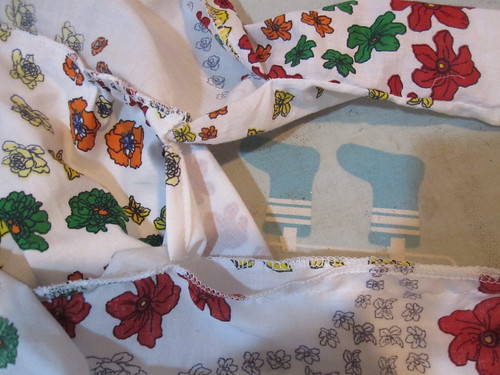


Stitch Tie Ends, Stopping 2.5 inches Before Collar
Next, I sewed the tie to the wrong side of the neckline, gathering where marked.  In this version, I discovered that the gathering was too concentrated to be flattering to my bust and increased the area over which the gathers are spread (marking the new spot on the front pattern) for the vintage fabric version.

When I am doing any kind of binding, waistband, or other finish like this I always sew to the wrong side first.  Then I turn to the right side and topstitch.  SO much easier than trying to catch the underside of fabric while stitching in the ditch, and quicker than hand-stitching. You have to be ok with a topstitch look, though.

Once the tie was sewn to the wrong side of the neckline, I finished the free ends of the tie by folding  right sides together and sewing to within an inch and a half of the neckline, then turning and pressing the tie.  The picture at right shows the tie sewn to the wrong side of the neckline and the tie ends finished.


Fold Collar Over to Front and pin

Next, press under the remaining free edge of the tie, which be will folded over to the right side of the neckline.

Fold the tie over to the right side and pin in place, making sure that your pressed-under edge overlaps the stitch line from sewing to the wrong side, so that first stitch line will be hidden.

Topstitch in place, close to the edge.
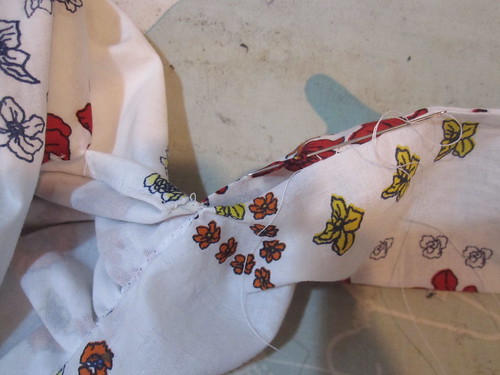


Hand Stitch Gap in Tie


The last step is to close the little gap left in the tie with some hand-stitching.  In hindsight, I probably could have sewn the free end of the tie all the way up to the neckline and still been able to turn it easily enough.  But a couple inches of hand-stitching never killed anyone.

For the cotton version I cut the tie as drafted, but it is too short to tie into a bow. On the vintage version, I cut the tie on the cross-grain (due to limited fabric) and cut it as long as possible, an addition of 10 inches to the length. It is good for tying a bow.


Pin Sleeve Lining


Cap Sleeve BindingI used the same method to bind the edges of the cap sleeve.  To make the puffy sleeve, I pinned the sleeve pattern in place and then just sort of extended it at the sleeve cap and the bicep.  Not very scientific but it worked.

I cut bias strips for the edges and pressed them into double folds.  I lined up one cut edge of the bias strip right side against wrong side on the inside hem of the sleeve.  Stitched in place, the folded the other end over to the front, the pressed edge overlapping the first line of stitching.  Topstitch.
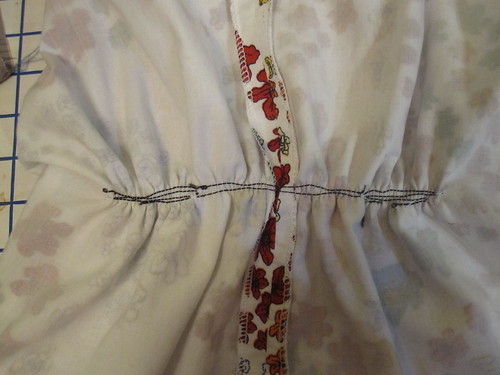


Elastic Thread on Inside Ruching
With my wearable muslin, I found that although the pattern had been drafted for jersey it definitely had plenty of ease to be sewn in a non-stretch woven, and did not need any kind of closure.

In fact, it was a little too roomy.  Because the cotton lawn is meant to be a Spring/Summer top, I knew the volume could not be controlled with belting.  A belt in summer is like strapping a mini-sauna around your waist.  The sweat is horrifying.  So I ruched a couple of rows with elastic thread in the bobbin at waist level over the side seam.  LOVE elastic thread ruching.  So incredibly easy.  Much easier than actual fitting, lol, and much less sweaty.
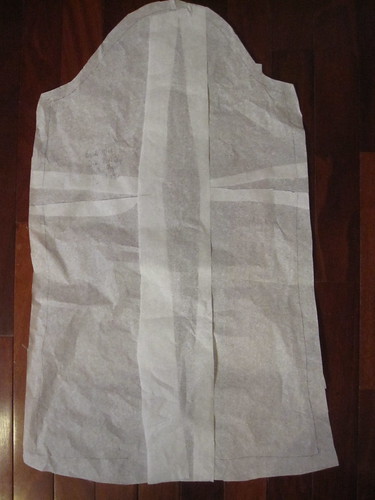

Sleeve-Full Bicep Alteration
Before I set the cap sleeve into the lawn version, I cut a sleeve muslin of the long sleeve.  This was the one area where the drafting for jersey was a problem, as I found it very constrictive.

I did a full bicep adjustment by splitting the sleeve up the center to the sleeve cap, leaving a hinge.  I spread this open, and then cut from the sleeve seam to the split at the bicep level, leaving a hinge at the center split.  On these hinges, I rotated the lower part of the sleeve so that the original hem width was preserved, and then filled in the spreads with tissue paper. There is plenty of room in the final sleeve, though I could have used a slightly larger broad back adjustment for a fuller range of motion through the arms.


French Seams


For the cotton lawn version, I underlined with cotton batiste.  With the vintage version, I didn't want to lose the flow of the fabric.  I lined it with a lightweight silk (china silk or habitoi weight) that has been in stash for who knows how long--I bought it based on a painted silk dress project shown on Craftster (lost in the mists of time) that involved stringing a length of silk into a clothesline and using watered down paint to let it drip down in lines,  knowing that I don't actually have anywhere to do silk painting like that!  There's a limit to what I'm willing to do to my bathtub.
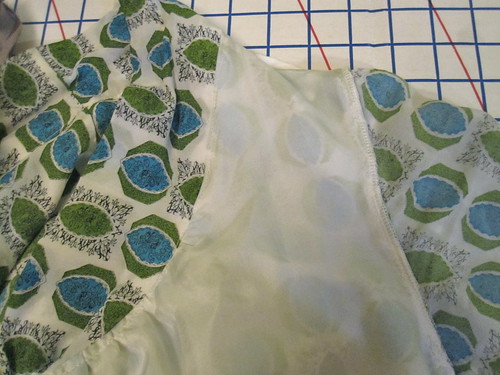
Lining Attached at Neck and Armscye


I sewed the center back, shoulder, and side seams of the fashion fabric and lining with French seams.  At the armscye and neckline I joined the two layers and treated them as one.  Paco just did a great tutorial on special seaming for transparent fabrics (UPDATE:  Paco kindly published my English translation for the post it is in Spanish, but the photos are helpful even if you don't speak the language), but I didn't do anything fancy at the armscye, just serged.


Vintage Front

Paisley Side
I am very happy with both versions of the blouse.  The giant paisley fabric is cuter made up than it was as yardage--though it kills me to make a Spring blouse before I can wear it!

In sewing up the vintage fabric, I realized that it is quite fragile and stained.  I think it may have been kitchen curtains--there are several large grease/glue spots that I can't get out.  So I was saving this precious fabric for years when really the resulting blouse won't last very long.

I considered cutting it single layer and then didn't but should have, as you can see at the CB seam.  Oops.

Love the style of the blouse and am wondering how many versions of it I can get away with.

All photos are here and the pattern review is here.


Tuesday, January 24, 2012

Pants. This is Why I Do Not Make Them.


Although I prefer skirts and dresses, there are times in the winter where I wish I had a pair of nice-looking, professional, trouser-y pants.  I am SO glad to have discovered Levi's 512s, which fit my body perfectly, so I don't need to worry about jeans.  But dress pants?  They do not exist.

Everyone loves the Burda crotch, and Burda fits me well in general, so I figured how hard could it be?  I traced off 02-2010-102 and blithely set to it.

Muslin 1-Front
V.1 Front
Muslin 1-Back
V.1 Back


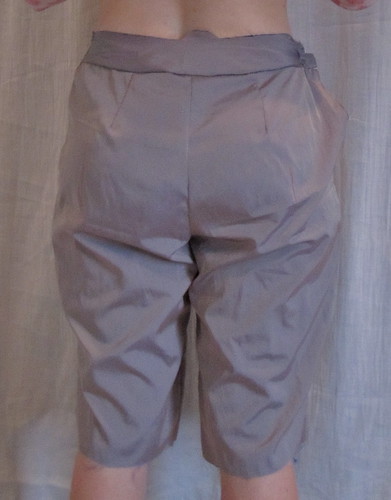
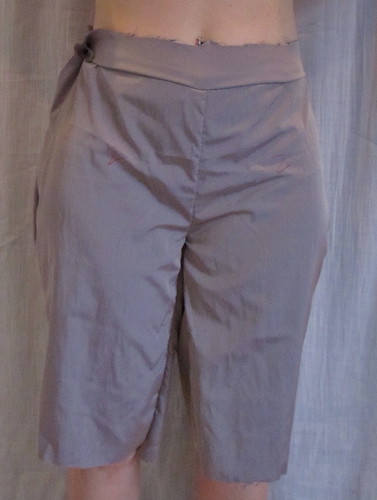
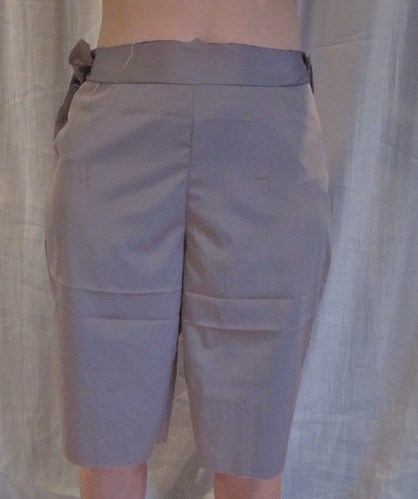
V.1  Out of the envelope (with larger SAs, to increase size to about 40 at the hip).  There was no way I was going to document the original front fit before I let out the CF seam and cut open the front waistband at CF to release it.  Horrible.  I do not have a pants body.  Smile does not even begin to describe it.  More like grimace.

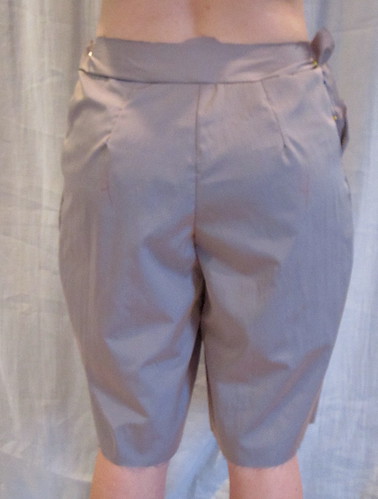
The back is a wrinkled mess.

Muslin 2-Front
V.2 Front

Muslin 2-Back
V.2 Back


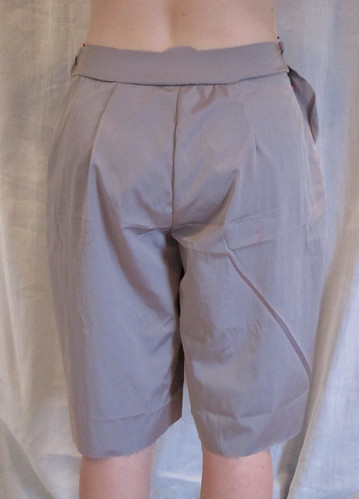
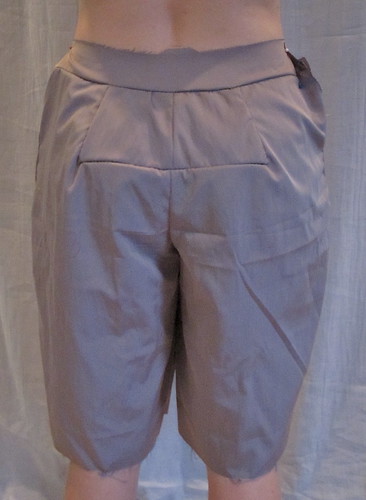
V.2  Saddlebag width increase; lengthen back crotch by 3/8"; add more room at CF seam for belly; knock knee adjustment to square off inseam from crotch as shown on Debbie Cook's blog.  Front smile lines continue and little appreciable change to back--the wrinkles may be slightly less deep but they are the same shape.  It is odd how doing a HUGE adjustment with the knock knee (in the case of the back crotch, moving the inseam 2 inches toward the inside) can have no effect whatsoever.

Muslin 2 Front with 3 Back
V.2 Front on V.3 Back

Muslin 3 Back on Muslin 2 Front
V.3 Back on V.2 Front


V.3.0  Added huge wedge to back by cutting from knee up through dart and spreading; same front as V.2.  The additional booty room does allow the wrinkles to relax a bit, but the much larger back is folding over the front at the inseam.


Muslin 3-Front
V.3 Front

Muslin 3-Back
V.3 Back


V.3.1, in addition to back wedge, increased front crotch length slightly; shortened waistline by 1/2" at CF, tapering to nothing at side seam.  This helps eliminate the front smile lines.  No appreciable effect on back.


Muslin 3-Back with Shortened Crotch
V.3.2 Back

V.3.2:  took up the back crotch by taking a horizontal dart, which lifted out the diagonal wrinkling on the legs

Muslin 4-Front
V.4 Front
Muslin 4-Back
V.4 Back


V.4  Further increase to front crotch length; removed back width wedge; shortened back crotch seam at about mid-butt; kept original length of CF crotch (too high to be attractive, I think).  Some wrinkling is reappearing at center front.  (I had eaten some cookies by this point, I'm not gonna lie.)

Muslin 4-Back with Shortened Crotch
V.4.1 Back

V.4.1:  even more length pinned out of back crotch.  It seems to help but the center back waist is now pulled down and there is still some wad of kleenex at the back crotch.  In addition, the more the back is shortened, the more the smile reappears at the front crotch.

At this point I was SO FRUSTRATED.  I decided to approach it from another angle and tried on all the pants in my closet.  All but one had the smile line at the bottom of the front crotch. 


RTW Pants 1 Front
RTW Pants 1 Front
RTW Pants 1 Back
RTW Pants 1 Back


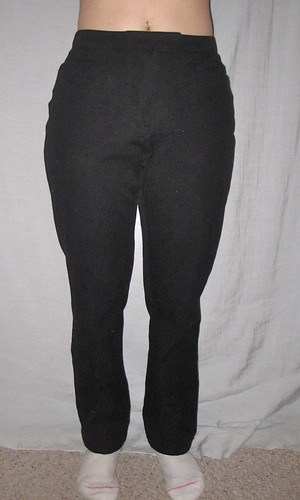
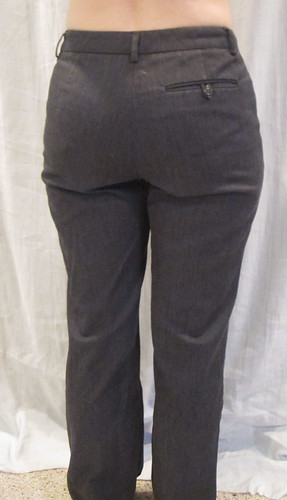
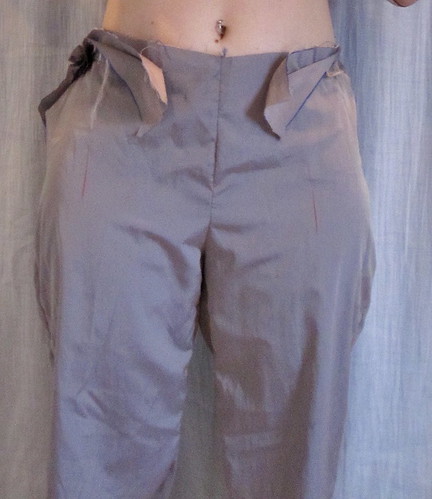
The best fitting crotch is on a hideous, unflattering pair of pants.  I think it has to do with the high waist and narrowish legs, but they are awful pants.  However, no smile.  Interestingly, the crotch intersection is way, way up front, slightly more than two inches below the zipper--totally the opposite of what I've been doing to the pants pattern (shortening the back crotch and extending the front).  There are some strange folds on the front inseam right at the crotch, though, that appear to be a bit...how to put delicately?... a la Georgia O'Keeffe.  This may be a result of the forward crotch.  Because of the shape, I think they are worse than a smile. (Sorry the photo is so terrible, they are a rich, matte black and I do not have enough photo wizardry to make them very visible.)

The back fit exhibits the diagonal folds present on all my pants coming from upper outseam and heading toward lower inseam.


RTW Pants 2 Front
RTW Pants 2 Front
RTW Pants 2 Front Lifted
RTW Pants 2 Front with "lengthened" front crotch


The other pants have the smile line at the bottom of front crotch.  Tugging the center front upward eliminates the smile (indicating more length needed on front crotch???).

RTW Pants 2 Back
RTW Pants 2 Back
RTW Pants 2-Fisheye Under Booty
RTW Pants 2 Back with fisheye dart under booty


Back view shows the same diagonal folding from upper outer thigh toward lower inner thigh.  Pinching out a fish-eye dart under the booty straightens out the leg wrinkles. 

The whole mess can be seen here.

I think I may have to give pants a rest.  I have 3 decent-looking pairs in the closet (got rid of the rest, except the hideous ones with the fitting crotch as a curiousity), though they are not the classy trousers I envision but fitted at the booty, as you can see in these examples.  They are not wool and are not lined, but they are better than my muslin, which does not necessarily seem to be getting better, only different. 

Pants!  Ugh!

Thursday, January 19, 2012

Frankenpatterning the Perfect Knit Wrap Dress

Wrap Dress Thumbnail

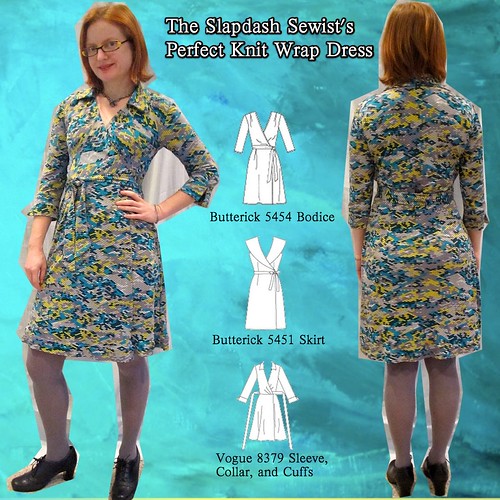
I have tried several knit wrap dress patterns in my quest for the perfect one. I've gone from the horrible disaster that was Butterick 3078 to the ok-but-not-great of Vogue 8379 to almost there with Butterick 5454 last year. My two main issues with B5454 were the Pleat to Nowhere in the shoulder and the slightly skimpy overlap on the front skirt.

When I bought this lovely and expensive (for me) silk jersey ($12/yd) from Michael's Fabrics last year I was determined to make it into a high-quality well-fitting DVF-style wrap dress to last the ages.  And so I called upon all my past wrap dresses (no seance needed) and took the best parts from each to create: The Perfect Knit Wrap Dress.

I would like to thank the following patterns for contributing:
Butterick 5454: Bodice and Tie
Butterick 5451: Skirt
Vogue 8379: Sleeve, Cuff, and Collar 

The last one, B5451, is not a knit pattern. This is the one I made in the double-sided acetate polka dot fabric and hated the fit of so much that I gave away the pattern. The only good thing about the pattern is the generous and secure front wrap. Ding ding ding! So I had to rebuy the pattern when Joann had Buttericks on sale. The skirt is a fabric hog, but it would take a gale-force wind to expose you under it. At the same time, the side seams are cut almost on grain, unlike the circle skirt of V8379, which is much more flattering to my saddlebags than 8379's bias.


Collar and Shoulder Gather Closeup


I kept my original broad back and small bust adjustments on the bodice. As I planned last time I made it, I converted the Pleat to Nowhere at the shoulder into gathers. The gathers still kind of open up into nowhere (I have been actively avoiding a sloping shoulder alteration, but I know I need to start doing it eventually), but I like them a lot better than the pleat.

I ended up adding darts to the back bodice, because it seemed a little gapey when I tried on the bodice without the skirt.  The fit conforms to the shape of my back.

To fit the skirt onto the bodice, I matched the centers and side seams, and then did inverted pleats in front and a dart in back with the excess fabric.

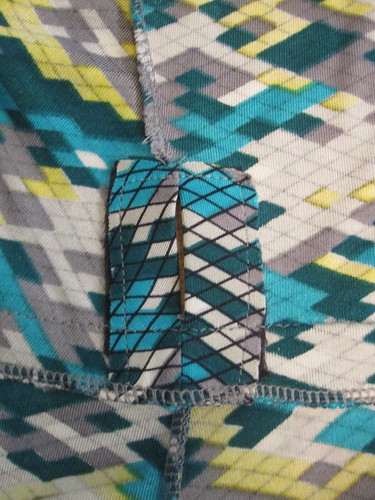
Tie Opening


Because silk jersey is lightweight and somewhat flimsy, I reinforced the tie opening in the seam allowance with lightweight interfacing.


Cuff Inside and Topstitching


I fused the collar and cuffs with tricot interfacing to give them body without crispness.  I considered fusing only one half of the collar but ended up doing both the upper and lower, which seemed the better choice.

To keep the cuff's seam allowance in place, I topstitched with a twin needle.


Collar Topstitching


I cut the collar on the fold of the fabric. It took some major origami to fit my pattern pieces onto this quite narrow fabric and the shape I ended up with to cut the collar out of worked well on the fold.  I did not lay the fold on the seamline, but on the cut line, thinking I would end up sewing the seam.  But I liked it on the fold, and it does not seem to large.

Vogue 8379 has a facing to finish the neckline, but when I made the pattern I found the facing just too thick, especially at the shoulders.  So I just turned the neckline edges under and topstitched with a twin needle, enclosing clear elastic.  I finished the wrap portion of the skirt and the hem the same way, minus the clear elastic.


Wrap Dress Front .Rain Boots


I used the tie pattern from B5454.  In my first version of B5454, I had limited fabric and had to improvise the tie, which ended up shorter than I'd like.  This time I used the pattern piece and it turns out that as drafted it is still shorter than I'd like.  I like the width and both ends are slanted, which fits the bodice well.  But next time I'll lengthen by about 8 inches.  I like to be able to tie a bow.

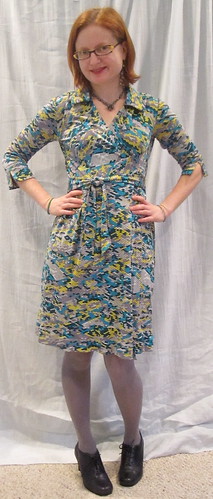
I am very happy with this combination of patterns.  The front wrap is very snug with no gape, the skirt has a large overlap, and the collar and cuffs add a nice touch to the look.  I will turn to this combination again the next time I want this look.  However, I will stick with the B5454 sleeve if I am not doing a cuff--the Vogue sleeve has more ease and was difficult to set in.

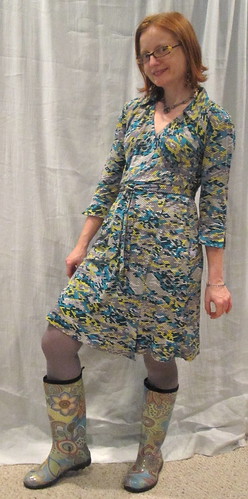
Just so I don't mislead you into thinking I am an actual glamourpuss, I actually wore this dress with the rainboots on the right. It was pouring!

All photos are here and the pattern review is here.

Tuesday, January 10, 2012

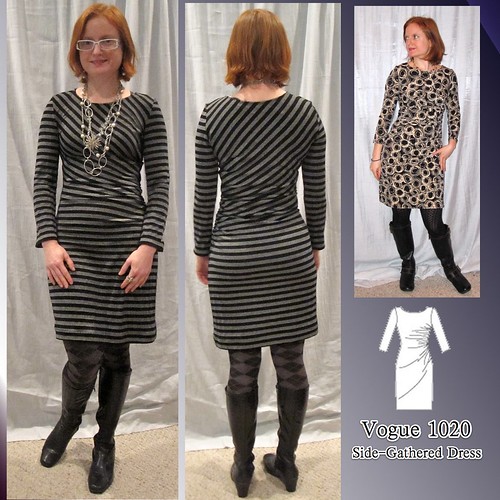
Vogue 1020, Side Gather Dress in Directional Stripes


Vogue 1020 Thumbnail


A while back I helped Cidell work on her sewing basement and in return took home a few goodies she was culling out of her fabric collection.  Among them was this striped knit.


I have a whole Pinterest board on directional stripes, but never find any striped fabric that I like.  This is a great knit--beefy, with good recovery.  I like patterns that play with the direction of the stripes without using seaming, just the pattern drafting, as in this T by Alexander Wang ($140).


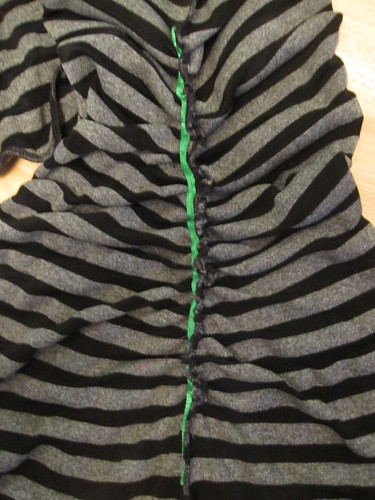
Ribbon Stay at Side Gather


 Vogue 1020 seemed like a good pattern choice for the experiment.  I had been wanting to make it again, as it is my winter "date night" dress and I was getting a little sick of the first version.

Mindful of my experience with the fit the first time around--way too tight, way too much belly--I cut it in a larger size at the waist this time, using the size 12 marking, the largest size on my pattern.  Unfortunately, it is still way too tight with way too much belly, and I don't like this version any more than the last one.  :-/

Last time I made this dress I gathered and stayed  both side seams before sewing them together, which did not work well.  My side seam was gathered more than it should have been (despite cutting my stays to the gather length provided by the pattern instructions).  This time I sewed the side seams together and then gathered, as per the pattern instruction.  Rather than use the instructions' stay length, I gathered it while wearing until the hem was straight and then stitched on a ribbon to keep it in place.

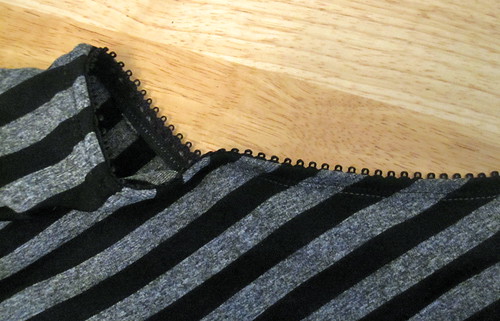
Picot Elastic Neckline
I did my now-usual picot elastic finish at the neckline.  I am sure I will eventually get sick of this, but it is much more enjoyable to put in than clear elastic and I think the look is cute.

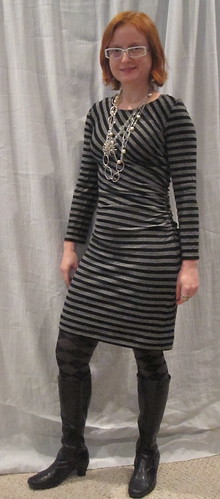
Striped Front


I think I am giving up on this pattern as a dress.  It just doesn't suit my body shape (and/or the dysmorphic body shape in my mind; also keep in mind that I am totally sucking in for these photos).  However, I think it would make an awesome sleeveless tee in sailor stripes for summer, so I am keeping my eyes open for a suitable stripe.


All photos are here and the pattern review is here.


Friday, January 6, 2012

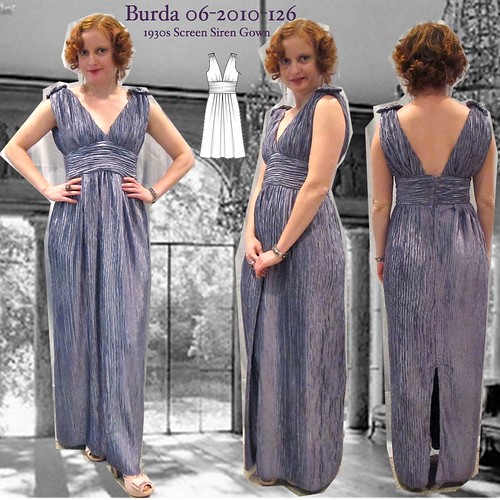
Burda 06-2010-126, 1930s Old Hollywood Glamour Evening Gown

Burda 06-2010-126 Thumbnail

One of our PR Weekend DC events (in addition to cake!) was visiting Exquisite Fabrics, which has to move out of the creepy Georgetown mall after only a couple of years because the mall's developer plans to renovate it, hopefully to make it less creepy.  Exquisite has not yet found a new space, but they are open through January 2012.  In the many years I'd visited it periodically, I had only bought one piece of fabric at Exquisite because much of it is high end (and high dollar) and I don't share enough taste with their buyer to spend the money.  They carry a huge selection of wool in all colors, and the one piece I bought was to match a wool jacket purchased at a thrift store--found the perfect piece.  Anyway, for their moving sale most things are 50% off, so I went bargain hunting.

Joan Crawford
When I found a roll of Fortuny pleated fabric in gray with subtle purple effects, I fell in love.  The owner at Exquisite told me it was from Mary McFadden's warehouse.  It was originally $60/yd, on sale for $30/yd.  It was in two pieces, one about 1 1/4 yards and the other 2/3 yard.  I bought the larger piece, thinking it would make a beautiful skirt.  Then I got it home, and started thinking about the wedding I would be attending on New Year's Eve.  I hadn't come up with an idea yet and suddenly had a vision of 1930s old Hollywood glamour and knew I needed the rest of that fabric.


Jean Harlow
The boyfriend works in Georgetown, so on Monday I called Exquisite to see if the 2/3 yard piece of fabric was still there.  My heart was pounding!  I really wanted to make my vision into a reality but the piece I had was not large enough.  They answered the phone.  The fabric was still there.  They put it aside for me.  I called the boyfriend several times to remind him to pick it up after work.  Mission accomplished.  So happy!  The next time I saw him we were off to South Carolina for Thanksgiving.  I'm not going to lie to you, I put the fabric in my suitcase and took it with me so I could caress it occasionally. At about $75 for fabric and supplies, this is one of my most expensive projects ever.  But I think it was worth it (and looks like more than a $75 dress).
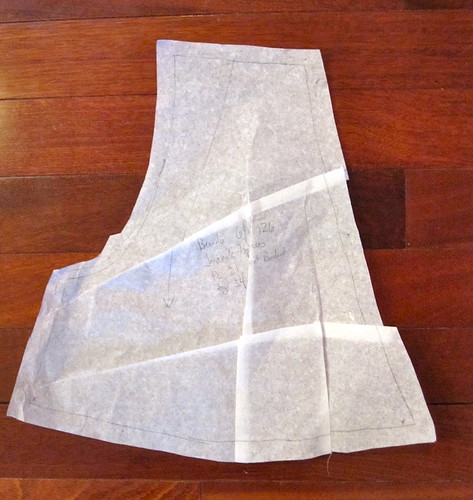
Next step was to find a pattern.  I wanted a triangle top front and back, but of course I purged all the sundresses out of my pattern collection because of my fear of sunburn (over the summer I realized that I want at least one strappy dress for evenings).  I went through my Burdas and came up with Burda 06-2010-126, which has the requisite triangle top, and a midriff band, which is flattering for me.

I wasn't into the shoulder ruffle, but the shoulder line is the marked gather line so it was easy enough to leave off the extra ruffle bit.

Front Bodice Pattern with SBA

I started by muslining the bodice.  Well, I was hoping the muslin could become the lining, but I had to change it significantly enough that it was just a muslin.  Before cutting the muslin I shortened the diagonal neckline and narrowed the gather area on the front bodice for a small bust adjustment.

After muslining, I took another tuck in the diagonal front neckline to shorten it further.

The muslin revealed the armscye to be uncomfortably high.  This is unusual on a BWOF pattern for me.  I lowered the armscye about 1/2 inch.

I also found the shoulder too tall at the shoulder edge.  This might have something to do with the gathered design, but I gathered my shoulder as well, just without the standing ruffle.  I had to shorten the shoulder about 1/2 inch at the shoulder, tapering to nothing at the neck (this also influenced how much I had to lower the armscye).

Then it was time to make the terrifying first cut into my most-expensive-ever and totally-irreplaceable fabric.  I pinned the pattern in place and walked away a few times before taking a deep breath and cutting.

Hand Stitch Midriff to Underlining
Of course, I did make a mistake!  I combined the midriff pieces so that it would be a single length of fabric with a CB seam.  I also changed the shape--the original shape was narrower at the top and wider at the bottom.  I am shaped wider at the ribcage and narrower in the waist, as are most people, so the design was a little odd.  I cut the midriff on the fold, and it turned out I didn't have the fabric laid out perfectly on the underside of the fold, and the pleats started wandering downward at the CB seam on one side.  Ugh!!!!

As it turns out, I had to fix that anyway.  For the midriff, I cut my usual size 34 at the ribcage to 36 at the waist.  It fit in the muslin, but somehow in the real fabric I found it *much* too small.  I added a squidge over an inch at each side using fabric insets.  I was so upset to have to interrupt my smooth  line, but it had to be done, and it allowed me to re-cut that wandering, off grain side (didn't have enough fabric to re-cut the entire midriff).

I underlined the midriff with lightweight lining fabric.  The weight of the skirt was hanging from it and it had to be stabilized.  I hand-stitched in the ditch at the side inset seamlines to keep the midriff fabric in place.

Mark Stitch Line on Skirt

I was not 100% sure how I was going to do the skirt when I started the project.  I figured I'd get the bodice done and then drape the skirt in place.  I figured I would need to do some side-seam shaping.  But while making the bodice, I saw that the pleated fabric gathered unexpectedly well, so when it came time for the skirt I just used the entire large piece of fabric.

I did not want to cut off the upper selvage as the fabric frays weirdly (more like fuzzes), even after being serged.  So I determined the skirt length (based on my shoes--I wore heels, OMG--Born Divinity, which is as comfortable as a heel that high can possibly be, which is to say, not very unless you are sitting down), which turned out to be 3 inches shorter than the manufactured width of the fabric.  I chalk-marked the skirt seamline and put my gathering stitches in above the chalk-line.  Then gathered and stitched to the midriff along the marked line.

I was so relieved with how easy this was, because I had been really sweating the timing.  I *planned* to have loads of time over the holiday, as I had two days off work after I returned from Texas.  Well, those days just evaporated and it got to the point where I had about 10 hours of available time before the wedding (assuming I sewed up to the moment I needed to leave) to finish the bodice, drape the skirt, and do miles of hand-sewing.  I had budgeted 1.5 hours for the skirt and it only took about 40 minutes.  Once it was on I breathed a sigh of relief that I would actually finish in time!

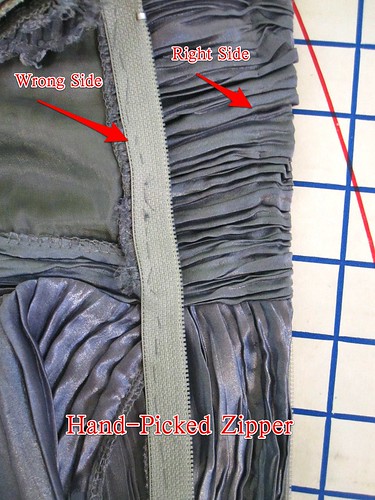
Hand-Picked Zipper
After the skirt was on it was time for the hand-picked zipper.  I use invisible zippers almost exclusively, and have completely lost my ability to install a regular zipper by machine.  After the last disastrous attempt, I decided that any time I need to put in a regular zipper, I will just do it by hand.  It's faster and nicer looking in the long run.  I didn't want to attempt to get an invisible zipper past the heavy seam at the midriff, so hand-picked zipper it was.

I started doing a beaded hand-picked zipper, but sadly it just looked like a total non-sequitor on this dress.  So I ripped out the beads and started over.  I had a couple of false starts, but eventually got the zipper in and looking pretty good.  The prick-stitching is practically invisible in this fabric, so all my hard work can't be seen!

After that hand stitching was done, it was on to hand-stitching the edges of the walking slit.  Although I *could* walk in the dress if the CB seam was sewn all the way down, I did have some restricted motion so I went with a slit.  I used the selvage as the hem.

Midriff lining

Next I needed to hand-sew the midriff lining in place over the skirt/midriff seam.  This had been on my schedule as a "dress can be worn without this" item, but I ended up having loads of time in the end.  So it was properly finished on the inside.  I used a lightweight but color-matching lining for the bodice in because I thought I would twist the shoulders, and a nicer but non-matching lining at the midriff.

My original vision was to twist the shoulder straps before sewing the side seams, as I did several years ago on the Vogue 8386 I'm wearing in my profile photo.  Unfortunately, the fabric was just too thick for it to look nice.  I needed to have re-drafted the bodice to have a thin strap, rather than a thick gathered one.  Alas.  So I gathered the shoulders (by hand).

The final step was embellishment.  This is always a mine field for me because I do not trust my eye.  I have a magpie instinct to pile on the shiny and the frilly.  When I was buying the fabric, the owner at Exquisite had said it was a great purchase because you can use every inch of it.  He demonstrated by folding a bit of the fabric with the pleats running vertically and then fanning out the pleats.  I was suitably impressed.

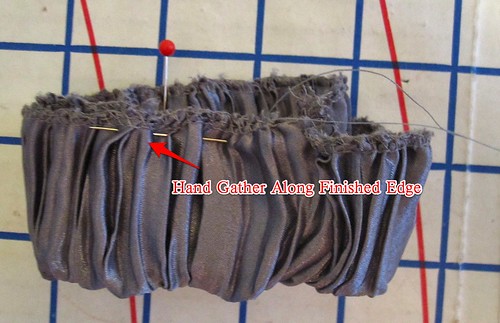
Making Flowers:  Hand Gather

So I took my scraps and made them into flowers, using a sort of modified yoyo technique.  First, I cut rectangles of fabric, with the pleats running down the short side.

I took them to the serger and finished all the edges, due to the fuzzy fraying.

Next, I sewed the edges together, with the pleats running parallel to the edges, to make tubes.

Making Flowers:  Pull Gather Thread


Then folded them in half, wrong sides together (with the seam along the inside), and did a running stitch by hand around the edges.


Pull the running stitch tight and knot in place, and then open out the flower.  Voila!


Making Flowers:  Decorate Centers with Beads

I bought some purple ribbon flowers in Dallas while visiting the fabric stores there.  I put the dress on my paper tape double and pinned the self-fabric and purple flowers cascading over the neckline on one side.  When I tried the dress on I couldn't tell if it was cute or 70s bridesmaid.  I unpinned all the flowers and started over, but just couldn't find anything I like.  Then as sort of a joke I put two big flowers on my shoulders and oddly, it totally worked.  Who would have guessed?  They are "upside down"--cupping the shoulders. I covered the messy middles with sparkly beads.
Beaded Midriff


 My last embellishment was to sprinkle (and by "sprinkle" I mean individually hand sew) small, very subtle smoky glass beads in the pleats of the midriff.  I'm not sure if they show at all to anyone not specifically looking for them, but my hope is that they randomly catch the light on occasion.  I like them, at any rate.


I could not believe how smoothly this went!  I had time to put my hair up in pincurls, make my dangle earrings, and even take a nap--which turned out to be very smart as we were out until 4:30 am that night!!!

Front
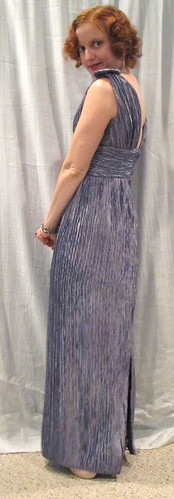
Side
I was entirely thrilled with the way the dress came out.  I felt that it captured my inspiration without being costumey and I felt utterly glamorous after an initial panic with my hair (when I took out the bobby pins the curls stuck straight to my head and I looked more Little Orphan Annie than movie star--combing, weighing down with clips, and using the curling iron as a straightener finally took care of it).  The fit is good and it was comfortable to wear and move in.

I wasn't the only person in a full length dress, thank goodness, and several guests gave me really nice compliments.  The bride told me I looked like a movie star, which was so sweet.

I LOVED wearing this dress.  It was my first true evening gown.  Now I need another occasion to wear it!

All photos are here and the pattern review is here.