Thursday, April 29, 2010

Burda 01-2008-127 Princess Seam Skirt

Burda 01-2008-127 Thumbnail

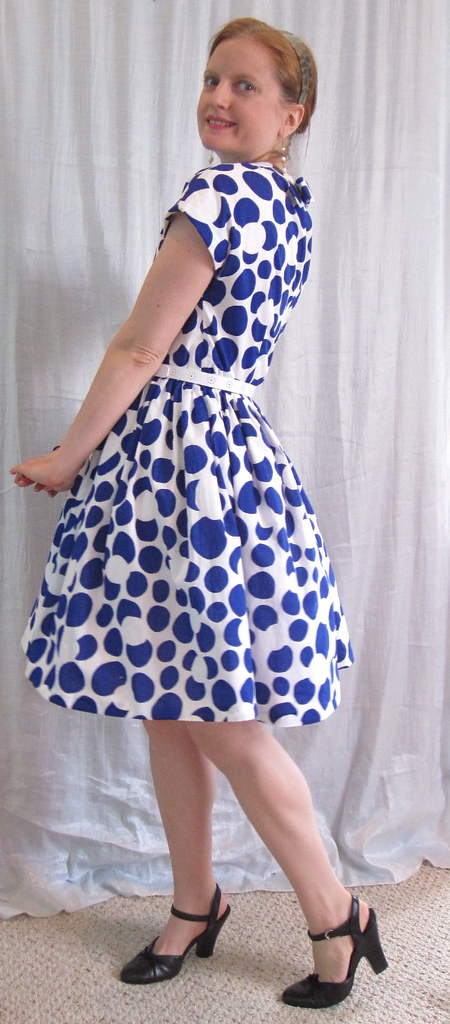
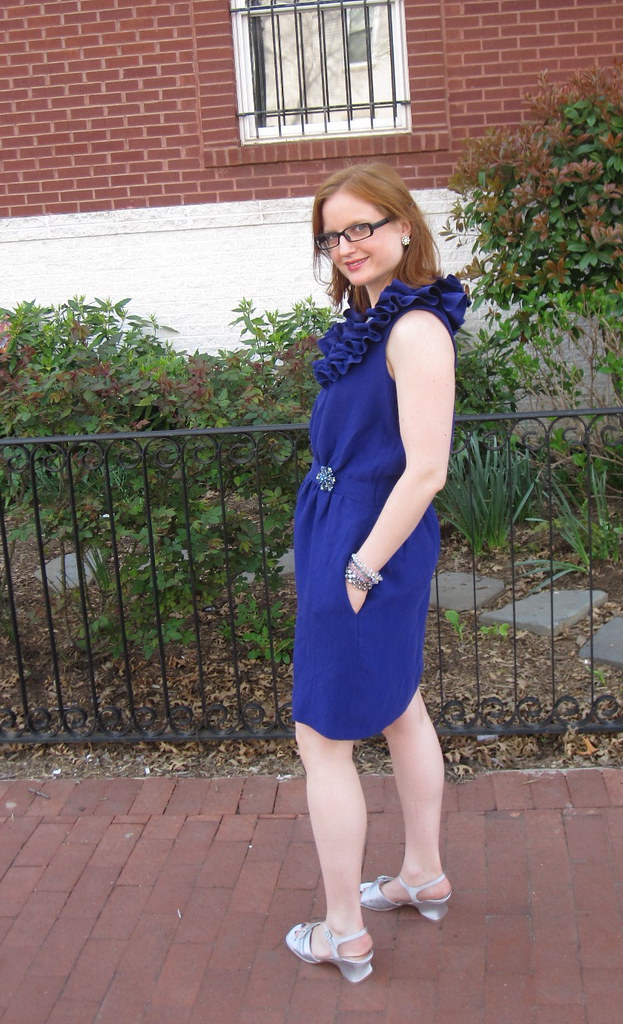
As previously mentioned, I am--for the moment--making tailored-style separates for Spring/Summer. Tailored might be a bit too strong of a word, which is why I say "tailored-style." High on the agenda is fitted and pencil skirt. I went through all my back issues of Burda and identified the skirts that interested me. I liked the princess lines, higher waistline, and overall shape of Burda 01-2008-127 and decided to start there.

I paid $11.25/yard for this fabulous silk cotton at Paron in NYC last June. For me, that is a high price so this was a "special" fabric. We all know there's a fine line between "special" and "too good to use." It took a little faith to make that first cut! I have a bit over a yard left so I'm on the lookout for a fabric economical but classy bolero or cropped jacket. Not that I'm promising ever to get around to making such a thing, but ya know. Doesn't hurt to look.

Inner Workings
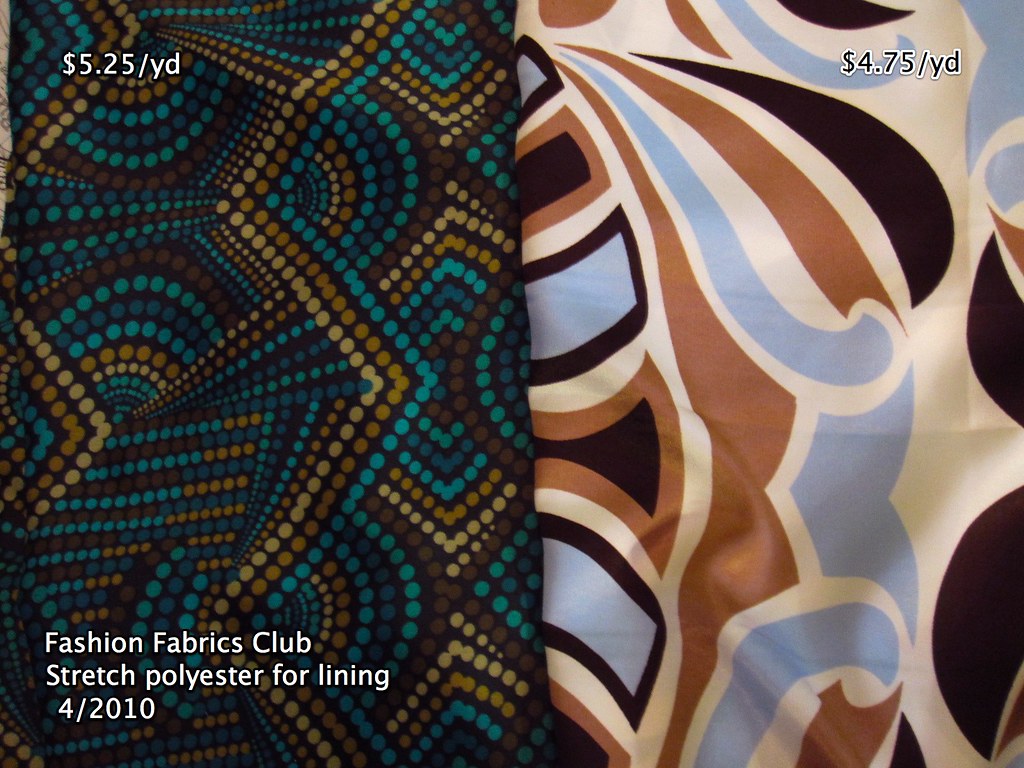
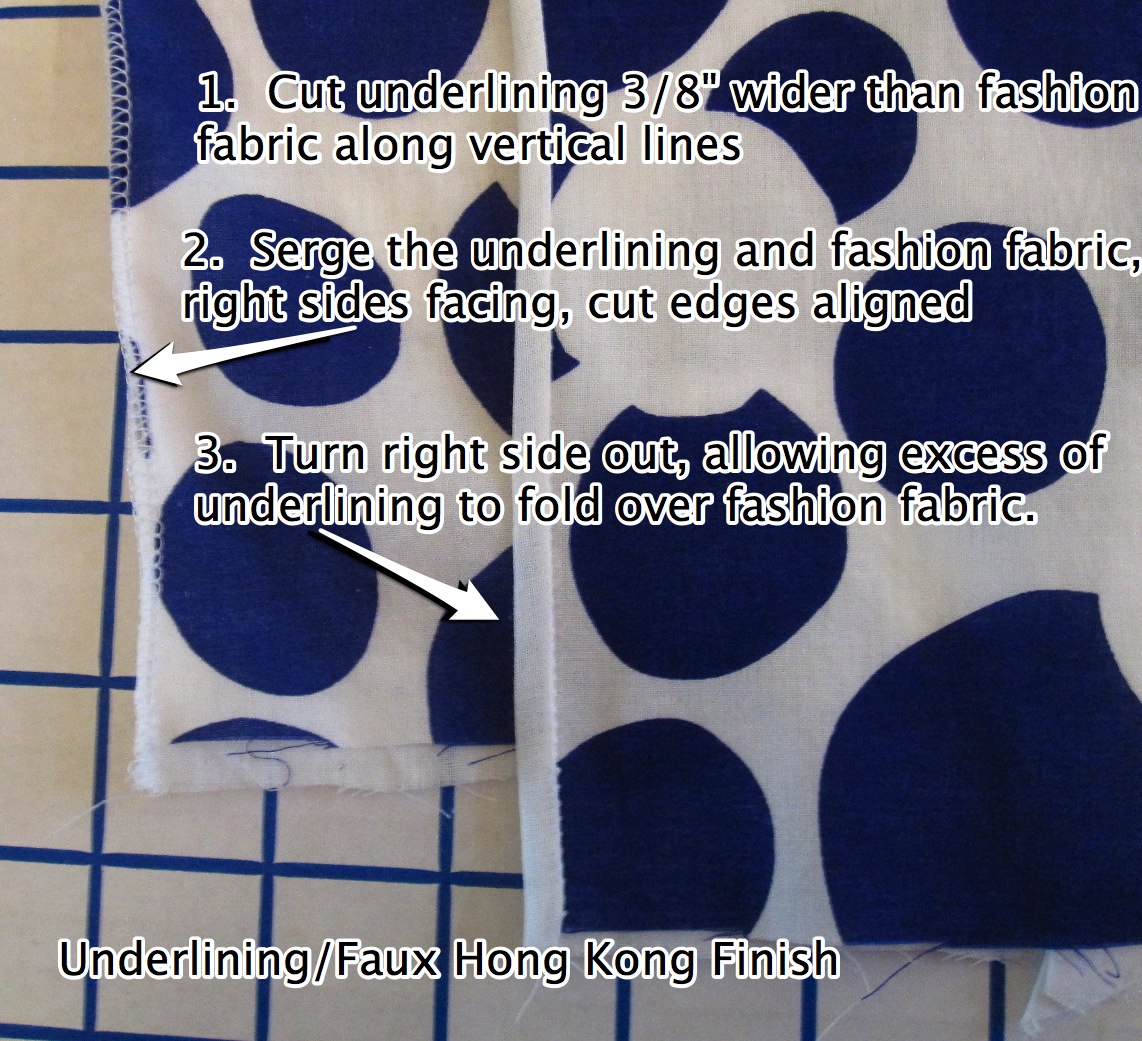
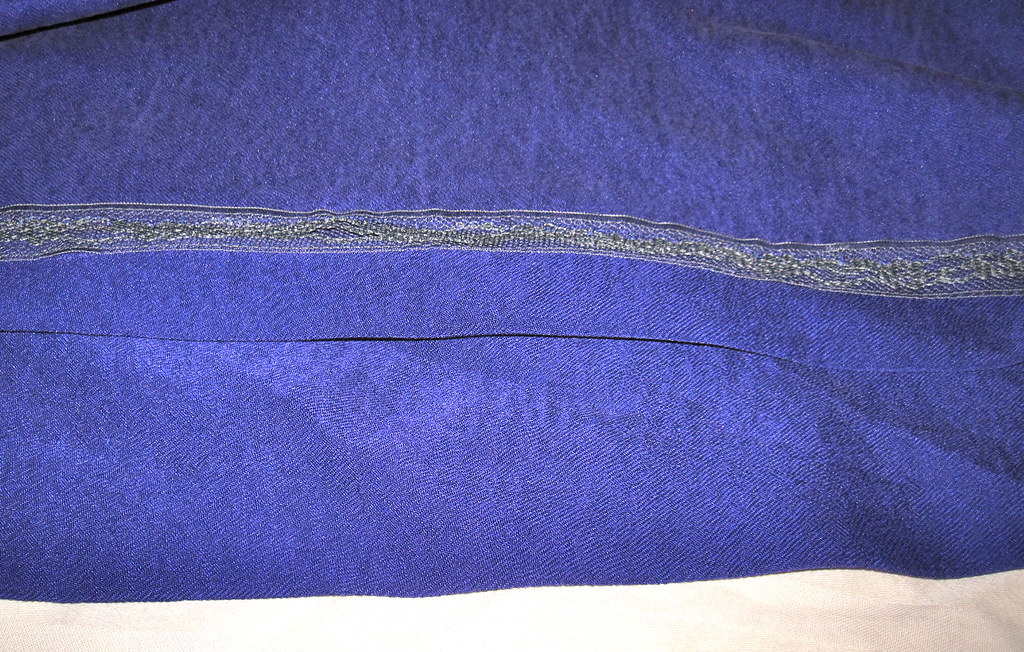
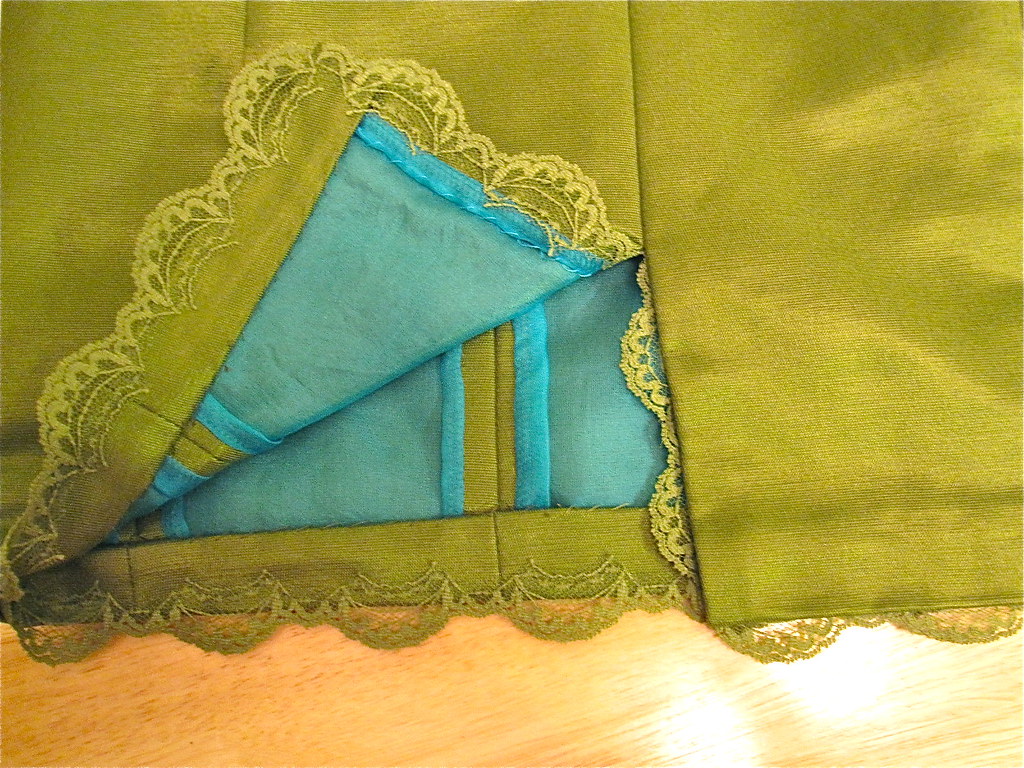
Knowing the fabric would likely wrinkle like crazy, which would make me afraid to wear it, I decided to try underlining with silk organza, as this is often recommended to reduce wrinkling. Handily, I picked up some silk organza at Paron (again!) last month. They didn't have any truly neutral colors, so I bought some very light blue (as the neutralest/lightest shade) and some turquoise (because it's my favorite color). I was going to use the light blue on this but then I was like, "Why not put together my two favorite colors, even if I'm the only one who knows?" LOVE the way they look together. I used the underlining/Hong Kong Finish technique demo-ed on my vintage shirtdress. Actually, I did this project first and from this one I learned that I prefer to add only 3/8 of an inch to the underlining width rather than 5/8".

Cut away lace 
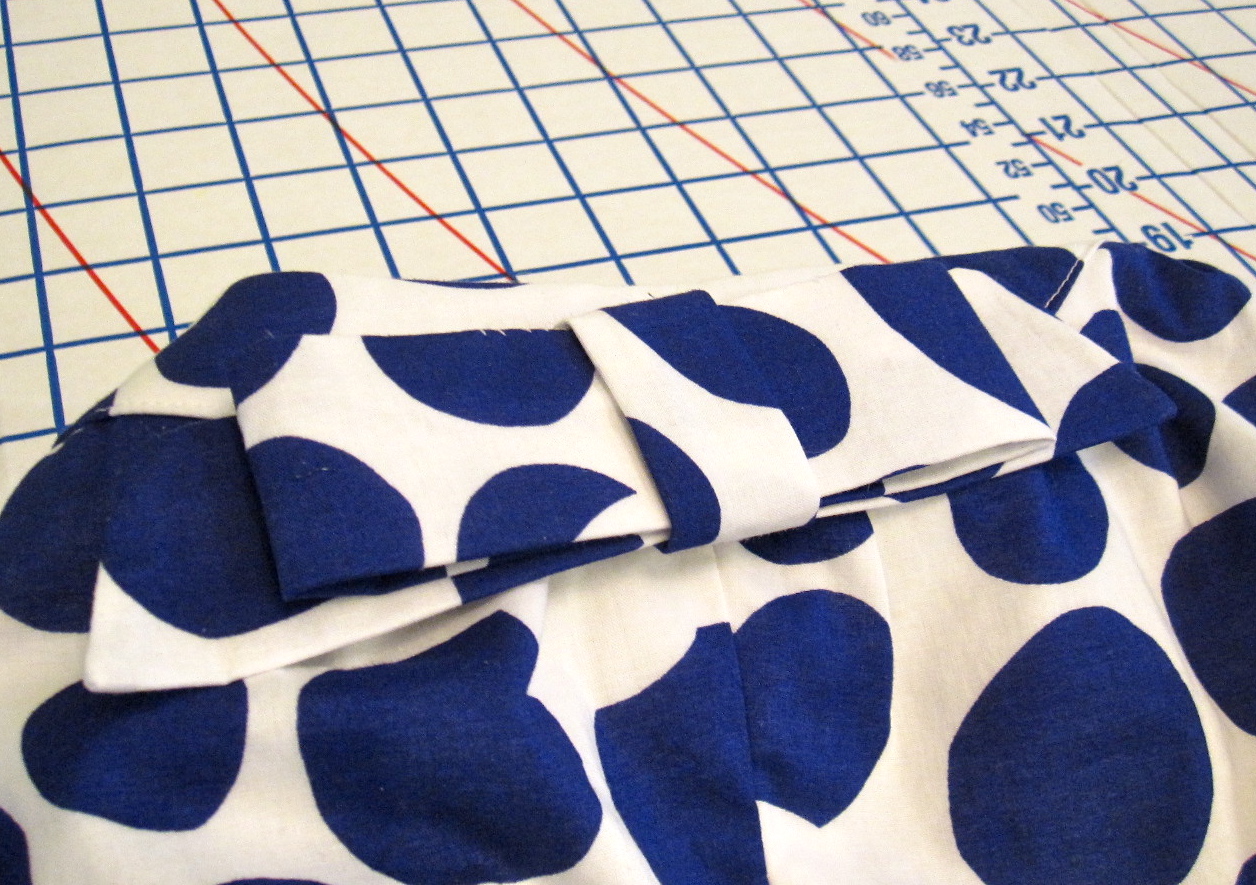
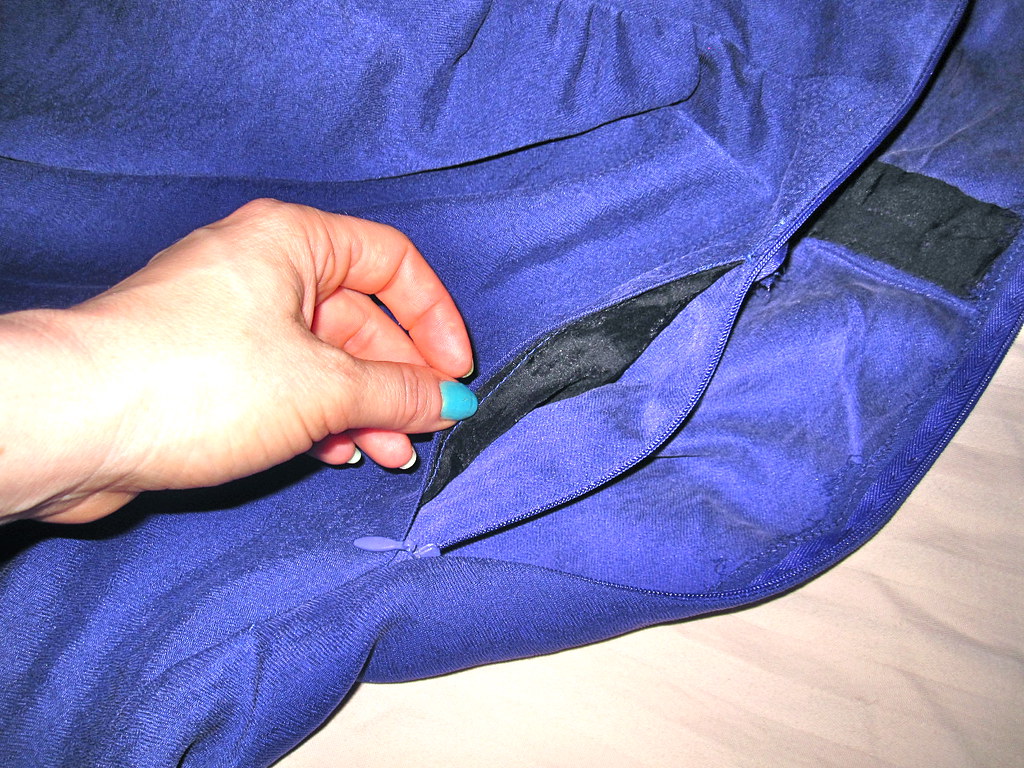
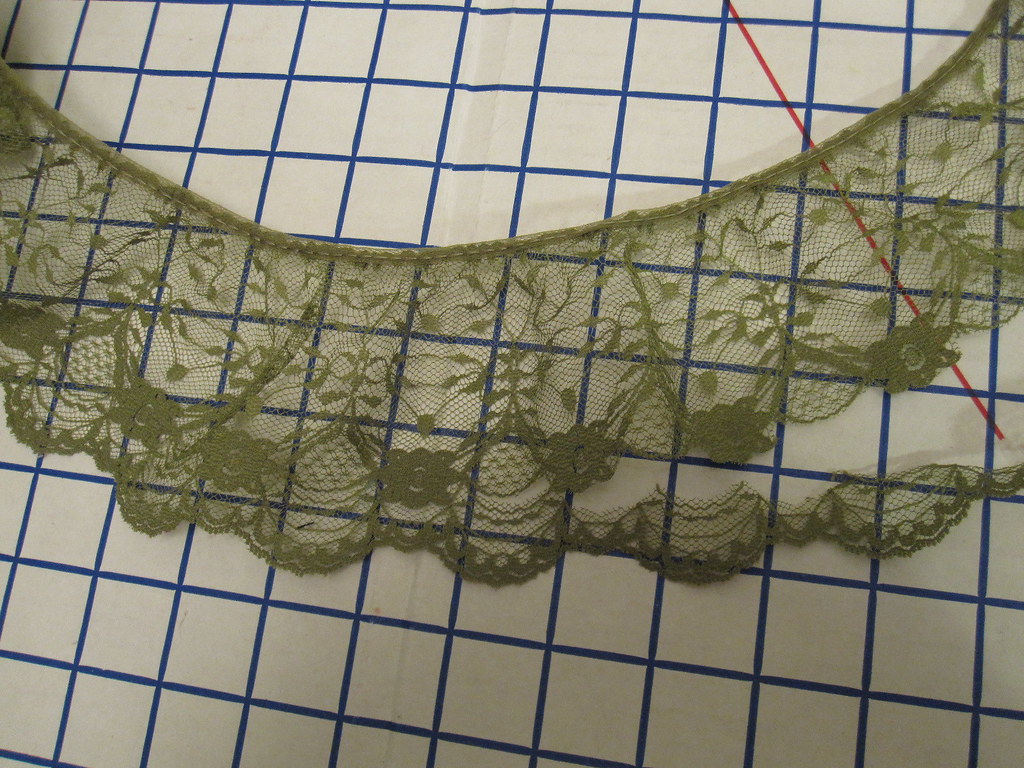
While I was in Texas for Christmas I found this lace at my mom's huge Joann that actually had some decent knit prints (but I didn't buy any because the prices at Joann are ridiculous even with the perpetual sale or coupon). It is one of my favorite colors so I had to buy it, and when I got it home I found that it matched this fabric perfectly! I don't know that this skirt really "goes" with a lace trim, but honestly I could not resist. I knew I didn't want to use the lace as is, which is wide and gathered. It seemed a shame to just waste it though, so I experimented and found out I could just cut off the lowest motif, which gave me trim wide enough for the skirt but made it so I can use the rest of the lace on a later project and nobody will be the wiser that it used to be slightly wider. I did the hem and the lace trim by hand.

I feel like I am having a "growth spurt" of the you're-not-in-your-twenties-anymore variety lately, ugh, so I went up a size and cut a 38 at the waist and a 40 at the hip. Pretty much from the time I started sewing until about 5 years ago I used to always, always, always make my clothes a little too big, arising mainly out of body dysmorphic disorder of the sub-clinical, garden variety, common to pretty much every Western woman degree of seeing myself as larger than I was and a related belief that I was going to gain large amounts of weight at any moment. It frustrated me that the clothes were too large, but I was just incapable of cutting the proper size because how could something that size possibly fit? At some point during/after a couple years of therapy for general depression (dysthymia, technically) I started making clothes that actually fit. I assume they were somewhat related.

Front
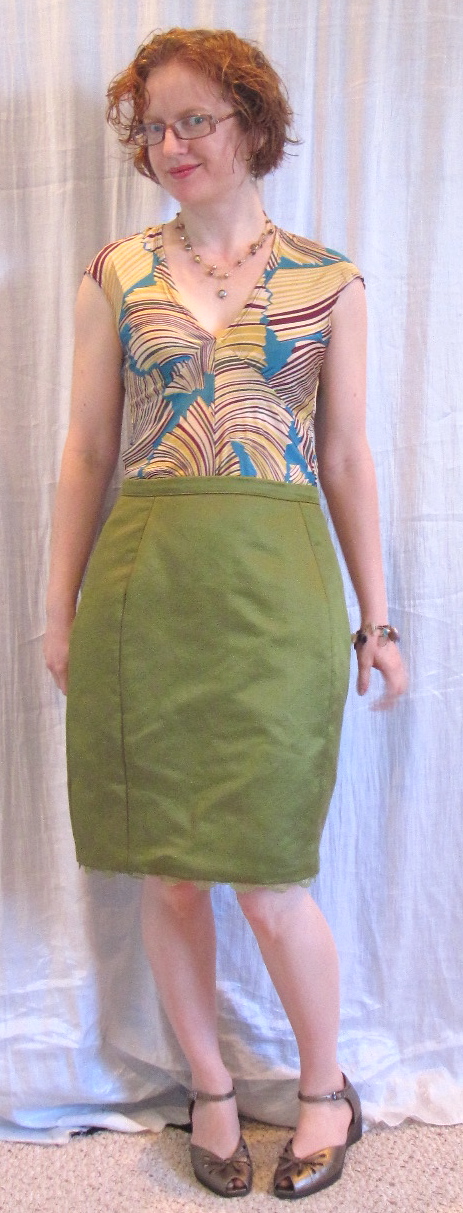
At any rate, at a size 38/40 this skirt is about a size too big, which brought back all these memories. It's not great for a tucked shirt because the waist sits a little lower than it's meant to, and I'm sure it will spin around and around my waist like a whirling dervish when I'm walking. *sigh* Unfortunately, the fabric is very delicate and shreddy, and I just don't think it will stand up to the seam ripper. If I decide I hate it at this size after a while, I will risk the fabric to make it smaller.

So I still need to figure out exactly what size to cut, because a 36/38 is sometimes legitimately a teeny bit too small to be flattering. This time around, I don't think I'm seeing things! On my 40s style faux shirtdress, if you look at this photo of the front you can see how the front skirt pleats are opening up a little too much and there are diagonal wrinkles from the pleat radiating down to my hip. And my tartan pencil skirt with front drape is a skootch snug at the waist; not unwearably so, but not entirely comfortable.

Based on my experience with this skirt, I probably don't need to go up a full size, but could use just a little bit more room...somewhere. It's a lot easier just to go up a size, for sure. I think the alternative is the Full Belly Adjustment. Not looking forward to going there.

This skirt is part of my Spring mini-wardrobe. I had it almost done in time for the PR contest, but the lining for the second skirt didn't arrive until the day after it ended. When I finish reviewing the pieces I'll do a collage just for fun.

I've been afraid to wear this skirt until I photographed it because seriously, this fabric is going to get SO WRINKLED. But the skirt is useless if I don't actually wear it. If it is ever again warm enough to legitimately qualify as Spring, I'll take it out and give it a whirl...or more likely it will give me a whirl as it spins around and around and around as I walk!

Aside from my own neurosis-induced fit issue, this is a really great basic pattern. If I make it again I'll make it a little smaller all around, but also slightly peg that side back seam as I feel the back falls too straight/kind of sticks out a little. I've made another fitted skirt since this one, with a little bit of a frippery detail. Although it's more fun to sew patterns with a frippery detail, it turns out the look I want right now is plain, simple, sleek, and chic. So I may be making this one again soon.

All photos are here and the pattern review is here.

Tuesday, April 27, 2010

Blouse Inspiration, Spring/Summer 2010

I am trying to focus on separates lately for Spring/Summer. I enjoyed the tailored look over Fall/Winter and think it is is easier to achieve with a fitted skirt and interesting blouse than through dresses. Although we'll see how long it lasts as I have a serious love affair with dresses! These are from the offerings at Saks.

Saks.com - Elie Tahari - Lindy Ruffle-Neck Blouse Saks.com - Fendi - Asymmetric Ruched-Silk Top All kinds of ruffles are still in style, which I love. Well, actually, I love them in theory. In truth I have very few items that actually have ruffles. I am a small person and (for the moment) I look younger than my age, so I do have to be a bit careful about too much sweetness. But I am always inspired by *seeing* ruffles. And these ruffles are quite sophisticated, I think. The Elie Tahari is more like origami than ruffles (still love the origami trim I did on this wrap blouse), which has the femininity without the juvenalia. The Fendi top is a more casual look, but I dig the external seam/ruffle situation, and a more wearable version--maybe even in the office with a jacket--is this St. John's version.


Saks.com - Etro - Marble Floral-Print Blouse Saks.com - Marc by Marc Jacobs - Silk Dots Top

Speaking of wrap blouses, here are two variations with plays on the collar. Love the wide, drapey lapels and watercolor print of the Etro--and I already have that look covered with my new favorite Burda 02-2009-123 wrap blouse with self-collar. More ruffles with the Marc Jacobs--double ruffles! And how fun it is to use a different colorway in the same print motif? This is something that can go from Marc Jacobs to Garanimals real quick, but I think here it is strictly grown up.


Saks.com - Akris Punto - Puffed-Sleeve Blouse Saks.com - Elizabeth and James - Ruffle-Shoulder Tank Top


The shoulder is still "very important," to quote a bit of silliness from Michael Kors' judging during Project Runway (early in the season). A way to use the shoulder without the molded shoulder pad are details like the subtle yoke on the Akris blouse, where the shoulder is emphasized by the directional usage of the gingham or the extravagant ruffles on this Elizabeth and James top (as for the tie dye--yeesh!).


Saks.com - Hanii Y - Tencel Tee Saks.com - Nanette Lepore - Angelfish Top Draping is another trend I like. I don't care for the unfinished look the of the Hanii Y t-shirt (I've already been inspired by a Hanii Y garment--my lace skirt), but I do like the double layer/asymmetry. Nanette Lepore shows a symmetrical drape, but the ribbon detail gives it a little more interest and I like that the tank is built in. BCBG has a classic oversized cowl tank; I think you get that look with the cowl neck version of the HP Three Graces top. I haven't been crazy about how huge that version looks on others who have used the pattern, but it does look rather appealing on the model.


Saks.com - Derek Lam - Silk Floral-Print Blouse
For pure inspiration, I love this Derek Lam faux corset top. The draping of the upper bodice and that little collar are so great, and the contrast color and closer fit of the lower bodice with the coordinating cuffs makes it a real impact piece. There are several patterns out there that could be used for this look--Butterick 4985, for instance--if you dare. I don't see myself dipping into this well in real life.


Saks.com - La Via 18 - Cap Sleeve Knit Top Saks.com - Torn - Gabi Ponti Top You all know how much I love a print; I rarely sew with solids. However, at this point it has been about three years since I bought any clothes and my old standby H&M t-shirts (which I've actually had for longer than three years, more like six) are eventually going to give out on me. But really, I just don't see how I could possibly sew plain t-shirts without experiencing an aneurysm of boredom. So I always like to see a variation on a tee.

These two illustrate what you can get just by altering/embellishing the sleeve. The Princess Seam made some tees similar to the Gabi Ponti top (on the right) a couple years ago and I have had them in the back of my mind since; her blog post also includes a photo of how she altered the sleeve to get the look. While out and about last weekend I saw two people wearing short sleeve t-shirts with a long, gathered sleeve cap like that, with elastic or gathering running along the center of the sleeve/outside of the arm. It was a cute little touch.

All my inspiration photos for Spring/Summer 2010 tops are here.

Thursday, April 22, 2010

Slapdash and Stashoholism Confessional

I gushed about the combination underlining/faux Hong Kong finish on my Simplicity 2827 '50s dress. However, nothing gets by my amazing readers!!!!

CJ asks:
I have a "slapdash" question. I love interior finishes like this, but how did you take the side seams in 1.5 inches after you did the underlining? Did you tear the whole thing apart after sewing it, and then re-underline it? Or did you test fit by basting the fabric before you sewed the underlining in? Or do you just have almost 2 inch seam allowances at the sides? It's alterations like this that always make me afraid of doing a nice interior finish. Thanks!

Side Seam/Armscye finish Ha! You totally caught me! Actually, Elizabeth did too over email. You all are too smart! You know I don't usually muslin but just adjust as I go, so it definitely is a danger if I've done a nice seam finish before construction that I will have nicely finished but unattractively enormous seam allowances.

In this instance, it actually worked out OK, just by happenstance. Because the bodice has a cut-on sleeve, the side seam kind of morphs into the sleeve's seam allowance. The pattern was drafted with much longer sleeves--low bicep or thereabouts--which just did not look modern or attractive. I shortened them considerably, when meant essentially eliminating the bend at the underarm. Because of that, I was able to fold up that extra side seam allowance into the hand hem (catching in only the underlining for a completely invisible hem on the outside) of the sleeve and it is not noticeable or unduly attractive that I have extra seam allowance in there. There have certainly been times I've not been so lucky! And just to answer your next question, I did not do the lower hem by hand! It is over 100 inches wide, are you crazy?!?! I used my machine blind hem.

==================================

I finally made it out to G Street Fabrics' new Rockville, MD location at 5520 Randolph Road. They used to be sort of catty-corner to the metro, but moved to a new spot further away. I had been meaning to get out there and make sure it is still walkable.

Bottom Line: I still consider it walkable, but it will be a 20-30 minute walk, depending on your speed.

Short directions:
Exit White Flint Metro and make a 180 degree turn to turn around.
Right on Old Georgetown.
Left on Nebel.
Left into Montrose Plaza.

Long directions with details and landmarks:
Come out of the White Flint Metro stop and make a 180 degree turn (turn around to face the opposite direction you got off the escalators).
Walk along Rockville Pike, the large main road that will now be running along your left side.
Make a right at the first street you come to, which is Old Georgetown Road. You will walk a fair distance on Old Georgetown (my random guess is a little under half a mile) down a hill, passing large apartment/condo complexes on your left. The road curves to the left at the Harris Teeter grocery store; stay on it. Old Georgetown dead ends at Nebel Street.
Make a left on Nebel and walk about 4 blocks through a complex of warehouse and retail space. On the way, you will pass Accents Beads on your left. If you have any interest in beads or jewelry you should try to fit in a visit.

G Street 4-9-10 Finally, you will come to a large traditional (as opposed to warehouse-y) shopping center on your left. It's called Montrose Plaza. You can't see the G Street at first, but you will see a Gold's Gym. Make a left into the shopping center and G Street will be on your left.

The store is slightly smaller than the old location, but it is definitely not tiny or cramped, and it does not appear that they reduced the breadth of the stock. I went because I was desperate for zippers, but I just *had* to cruise past the $2.97/yd table (hey, it was near the bathroom!). I found the knit print above, and couldn't pass it up. Love hot pink, love graphic prints, it is all me.


==================================

I have plans to make several solid colored straight or pencil line skirts using the stretch wovens I got from Kashi when I went to NYC last month. I have finally come to acknowledge that you really need a slippery lining in a skirt--whether separate skirt or skirt half of dress--because if you ever wear tights with it a cotton-y interior with catch the tights and look horrible while you walk. However, I am planning to make the skirts snug to take advantage of the stretch, so I need silky stretch woven linings.

FFC 4-2010I checked out the usual suspects, Fabric.com and Fabric Mart. Neither had any kind of stretch woven lining, or silky wovens with lycra that are not officially lining but could work as such. Crazy! So I went to Fashion Fabrics Club, which not only had some great poly/lycra prints (when did I ever think I'd say that?) but also a wide color spectrum of stretch lining. I ordered the two prints above and 6 yards of a light colored stretch lining.

After a long delivery saga, imagine my dismay when the solid colored lining turned out not to have any stretch! It is listed as 2% lycra, which I know is not much, but it is seriously the most stable silky polyester I have seen. Ugh. I am negotiating with them now on the return--I do NOT think I should have to pay return shipping for a fabric that was misdescribed on the website and therefore useless to me when I received it. I really wish Fabric.com had something that would work! Fabric Mart now has a cool gray-tone Pucci-esque poly/lycra print, but I really need a solid, light color to use under non-opaque fabrics. Grrr. However, I think I have enough of the two prints above to line my skirts, and I'll be on the lookout at PR Weekend.

Monday, April 19, 2010

Vintage Simplicity 2827, Vintage 1950s Shirtdress

Simplicity 2827 Thumbnail

When Pattern Review announced that the challenge for April 15-May 1 would be Vintage Patterns, I decided I should interrupt my regularly scheduled sewing to actually stitch up one of the many vintage patterns that I own. However, nothing was really grabbing me in my vintage pattern stash. But then I remembered this pattern, Simplicity 2827, which for some reason I had put into my regular Dresses-Woven pattern stash instead of with the rest of the vintage patterns, probably because it totally works for modern day.

I have no idea where I got the pattern. For some reason I associate it with Karen. [**EDIT** Confirmed! Karen tells me she gave this to me at PR Weekend 2007. Thank you, Karen!!! Both for the pattern and for jogging my memory.] It does not have a copyright date, but the style and the price (I looked in the Vintage Pattern Wiki for comparison) put it in the late 1950s.

Simplicity 2827It is a Miss Size 14, 34 Bust (corresponding to a 26 waist and a 36 hip). I am a 32 bust with a 27.5 inch waist, so I had to do some altering. When I pulled out the pattern tissue there was a tiny shorten adjustment pinned into the bodice, which I thought was so cute! I traced the bodice front and back. On the front, I scooped out a little width under the arm, narrowed the two darts, and added some width at the waist. For the back I just added to the waist. After I put the dress together, although the bodice had seemed the right length in the tissue and in the fabric, once I added the skirt it was too long, so I shortened it by 5/8 inch. The bust area was still too large, so I tightened the side seams, taking out a total of 1.5 additional inches. As with my vintage 1947 shirtdress, I think the illustration shows a much more fitted dress than it was actually drafted to be. I guess ridiculous ease is nothing new to the Big Three.

Vintage ButtonsI bought the fabric, a large scale abstract floral print, from Fabric Mart in June. I have been feeling so guilty about that order because I hadn't sewn anything from it! I just couldn't find the perfect project for this print (and seriously, it was $3.74/yd) so I dithered and dallied and now I am so glad to have it done. Of course, there are three more fabrics in there waiting to be sewn... I got the buttons at last year's Goodwill Trunk Show; I don't know how old they are, especially as there is no price printed on the card, but I would hazard that they are older than I am. They don't match exactly, but I liked the idea of using vintage buttons on a vintage pattern.

The cotton print was somewhat sheer and needed to be underlined. I underlined with cotton batiste and used Julieb's tip from pattern review on doing a combination underlining/faux Hong Kong finish This is my new favorite thing; I just used it on a skirt (haven't photographed it yet), so when I had to underline this project I used the same technique. You can only use it to finish the seams along one axis, either the horizontal or the vertical. In general, it will be best to use it for vertical seams, as your horizontal seams will be finished by hemming and a waistband or neckline finish.

Underlining with Faux Hong Kong Finish The tip has you cut the seam allowance on the underlining twice the width of the fashion fabric seam allowance, but that was too wide for my taste in the skirt project. So for this dress I cut the underlining an additional 3/8 inch wider than the fashion fabric. As with my cheater French seams, I use the serger to stitch together the layers, which gives a very precise seam allowance.

Each piece is finished individually before being sewn together. After cutting the underlining an additional 3/8 inch wide, line up the cut edges of the fashion fabric and underlining, right sides together. Serge together.

Then turn the piece right side out. Lay out the piece so the serger stitching lies flat with the underlining wrapped around it and press. That's it!

I love this method because it is only a hair more work than just constructing a pattern normally (I'd underline sheer fabrics and serge all those edges anyway) for a really lovely finish on the inside.

Snap Closure You can see how pretty my seams are in the photo at right. To finish the upper edge of the skirt I first did the vertical seams as describe above. Then I turned the piece so the right sides were together again, rolled the underlining of the vertical edges outward, and serged along the top edge. Turned right side out and pressed, this time with the serged seam at the top, rather than the underlining rolled over. It's nicer than having the serged finish showing.

The closure on this was interesting. If this were designed now, it would have the buttons and buttonholes along the front opening edge the same way, but the lower edge of the button bands would be stitched together and there would be a short invisible zip at the side seam. However, this has a sort of faux fly in the center front seam with snaps. This gives enough room to get in and out of the dress with the look of a continuous skirt. I only had x-large, large, and teeny snaps. I'll have to remember to get medium snaps the next time I go to a fabric store and then I'll replace those large snaps. They don't affect the look or hang of the dress and are perfectly functional, but I think aesthetically they're too large and heavy.

Back Neck Bow 1950s-Back Neck Bow I love the little bow on the back neck, it's one of my favorite parts. I was a little disappointed with the back neck as the pattern illustration shows visible gathers but there's really not enough extra fabric there for visible gathers. But the bow is cute. Unfortunately, with my print it kind of disappears. I am going to have to look for a royal blue ribbon to replace it.

I had fun dressing this up for the 50s with a crinoline and pearls and a chignon (I tried gloves but I only have off white gloves which looked weird with the white of the dress), but it can also be worn in a modern, non-costumey way. All photos are here and the pattern review is here.

Wednesday, April 14, 2010

Stylish Cloche Japanese Hat Making Book Project and Review

Stylish Cloche Thumbnail

I ordered Stylish Cloche from Amazon.jp after seeing the project made by Diary of Matter Hatter and falling in love with it. I did a google search, but didn't find it anywhere. I should have done a little bit more research; although the book was a reasonable $18 the shipping was $35 so the total cost was over $50. I see that it is now available on Etsy for $28 with $10.50 shipping, which is a little bit cheaper.

Pattern Options in Stylish ClocheThere are some pattern books for which I might be willing to pay $50, but when I received the book I realized it has just three crowns and three brims, and one of the crowns is a top-hat style crown and I already have several serviceable patterns in that style. The options are stylish and (judging from this one) well drafted, but had I known there were so few patterns I don't think I would have ordered it. Oh well, it's only money. Although there are limited options, the fashion photography in the book showing many different versions and combinations is beautiful and inspiring, as you can see in this image.

The patterns come in three sizes:
S 56 cm (approx 22 inches)
M 57.5 cm (approx 22 1/2 inches)
L 59 cm (approx 23 1/4 inches)

Instruction sheet in Stylish ClocheSeam allowances are included appear to vary somewhat depending on the piece (they are marked in the construction diagrams), but it is generally 6 mm, approximately 1/4 inch. The text is Japanese but the numerals are Arabic and the instructional diagrams are extremely clear and detailed. There is no real language barrier to using this book, which is quite a feat on the part of the technical illustrators! Hats off to them, if you'll pardon the pun.

My head is actually 21.5 inches rather than 22, but with the small seam allowances I figured I'd just sew them a little bigger if need be. However, those tiny seam allowances turned out to be a problem in my relatively thick fabric, and in fact the hat turned out too small, which is so annoying! It spent several weeks on my hat block stretching, but the stretching didn't really take. Sad. The upside is there is no chance of it getting blown off in the wind; the downside is the large welt it leaves on my forehead. In the future, I will plan to trace the pattern and then strip out the allotted seam allowances and add back my own, larger SA (I prefer 1/2 inch). Although seam allowances aren't marked on the pattern in the traditional Western manner (a dashed line along the entire perimeter), they are marked with little lines topped with a circle at various points so it shouldn't be *too* difficult.

From Above For this project I used Crown M and Brim B in size small. I used wool tweed left over from making this pencil skirt. Actually, I cut out and made the hat at the same time, and there was pretty much nothing left of the fabric, which I thought was quite a coup.

The pieces fit together well and create a pleasing line. The crown does seem to be a smidge too tall for my head, but that may be because it is too small to properly pull down all the way.

Inside Finish I lined it with some of the Vera Wang Silk/Rayon blend (it's great for hat-lining, thick and slippery), and finished off with a ribbon.

Because it's too small I haven't gotten a ton of wear out of it--there is a small window of weather in which you can wear (1) a wool hat but (2) it doesn't cover your ears--but it was a promising foray into the book and I can correct the size issue on the next one. All photos are here and the pattern review is here.

Thursday, April 8, 2010

Simplicity 2497, Rufflicious Cocktail Dress

Simplicity 2497 Thumbnail

A dear friend got married last weekend and the attire was "cocktail." To me, this implies something different than semi-formal. They would probably be the same skirt length, but cocktail is a little more playful and stylish, rather than timelessly elegant. It seemed like the perfect venue for Simplicity 2497. It is not your typical "short, tight, and shiny" cocktail dress (much to my date's chagrin, I am sure) but definitely has an element of playfulness as well as a tasteful level of sexiness.

Fabric Evolution The fabric is the fabric.com $1.99/yd Vera Wang silk/rayon satin I bought in a frenzy in January. The fabric was lovely when it arrived (I couldn't get a photo capturing the satin sheen but trust that it is like normal satin), but pre-treating crackled and ruined the finish.

Figuring I had nothing left to lose, I ordered some iDye in violet from Dharma Trading (why did I not also order some iDye poly in black??? I am so annoyed with myself. I feel their shipping is too high to do a small order but I don't need anything else.) The fabric took the dye well, but I did not like the way the right (satin) side looked. The color was very grapey, and although the surface crackles were gone there was definitely some kind of textured look going on, sort of like a sand-washed silk, maybe. Bottom line, it just wasn't pretty or youthful.

When Cidell visited I solicited her opinion and she said she liked the wrong side of the fabric best. It took me a little bit to adjust to the idea of using the wrong side, but it was definitely the best choice. The wrong side dyed evenly and more richly than the right side. It has a twill weave that gives a little bit of visual interest. And I had been uncertain of satin anyway as it pretty much always looks like a bridesmaid dress.

The fabric is almost beyond medium weight into heavy, which had it's good and bad points. It did not need lining, which was fabulous. On the other hand, it did not interact well with my serger so I had to flash back to the olden days and zigzag all the edges. Ughhhhh.

Hem Lace for Blind Hem The neckline and armscye are finished with self bias tape and I couldn't get a great turn of cloth on them. They are fine--especially as the neckline is covered by a ruffle!--but if I'd had time it would have been better to get some coordinating fabric for the bias tape. If I'd been thinking about it I could have thrown some into the dye bath, but it was way too late for that. To reduce bulk, I used lightweight lining for the front pocket bags and the midriff lining. I wanted to do a machine blind hem on the skirt, but there was no way I could turn under the edge and then stitch the turned under edge for the hem as it would have been too thick, so I used hem lace, which gives a nice little touch inside.

Pocket Alongside Zipper Side The pattern instructions provide a clever and vintage-y method for installing a pocket along the side seam with the zipper. I'd run across such directions once before but moved the zipper to the center back, as is my preference. Here, I feared moving the zipper to center back would make the back too bulgy. I followed the directions, which seem complicated but aren't if you follow them step by step. I am very pleased with the way the pocket turned out, although in the end I wish I'd moved the zipper to center back. Better a symmetrically bulging center back than one normal side and one bulging side. Ugh. It's not necessarily going to catch the average person's eye, but it is obvious to me that the two side seams fall very differently (you can sort of see it in this photo; the zipper is on the same side as the pin on the midriff).

My biggest complaint about the pattern is that the neckline is LOW. I mean LOW. I have no such thing as cleavage and don't mind a low neckline but even on me this was ridiculous and showing my bra. Because of the thickness of the fabric, I had to hand gather and then hand-stitch the collar to attach. I used the ruffles as strategically as I could to provide more coverage, but really I needed to raise the neckline at least half an inch, maybe even a full inch. Also, I took about an inch total, half inch on each side, out of the width of the front bodice below the bust point for a small bust adjustment. I think I should have taken it out of center front instead so that it would narrow the neckline.

The Bride and II had very little time to make this dress and did almost all of it in 30-60 minute increments on week nights. Luckily, it's not that hard. I was pretty skeptical about it while I was making it and did not think it would be flattering. I feared the waist would fall too low and the bodice would be too billowy even with the SBA. I experimented with pleats instead of gathers but couldn't come up with anything satisfactory and was running out of time so just went with gathers. I was hoping it would be one of those projects that looks terrible until the very end, but was already figuring out which backup dress I should wear.

But I think that it did end up being one of those projects that looks terrible until the very end, and when it was finished I was mostly happy with it (the bra-revealing neckline and bulgy zipper in side seam being the causes of the "mostly"). I got a TON of compliments on it at the wedding, but most people knew I sew my own clothes so I can't tell if they felt obligated to compliment me or or actually liked the dress, lol.

I don't think plan to make it again but how cute is Meli88a's casual seersucker version?

I did not have Cidell to do my pictures, alas, but I did have a human photographer who even managed to include my feet in a few shots. All photos are here and the pattern review is here.

I'm going to have to do some sewing this weekend because I am now pretty much caught up on project blogging (Ok, there is a blouse and a hat still to go)! Eep! I still have a dozen or so pieces from last year I could write about, though, so maybe I'll just do some pictures instead. `-)

Tuesday, April 6, 2010

FIT Museum, More Fabric, and Q&A

When I go to New York, one of my must-sees is the FIT Museum. Not only does it have high quality, interesting fashion exhibits with the clothes out in the open air rather than behind glass and (in the basement) displayed so that you have a 360 view, it's free! It's only a short walk down from the fabric stores of the garment district and open on Saturdays (closed Sunday and Monday).

I wasn't disappointed this time!

Sportswear, 1929, France, FIT Exhibition The main ground level exhibition is Night & Day (through May 11), which explores the idea of different clothing for day and evening over the past 200 years or so. It has the most temporal breadth of the exhibitions. I always love seeing pre-20th century clothes just because "ooooh, old!" Also, man, those corsets. The waists on some of the dresses are minuscule. I can't get over that people managed to live past forty without being able to breathe or get blood to their organs. The exhibit was well-curated, and includes luscious accessories in addition to clothing.

Yeohlee, Mercury Bellows Dress, FIT Exhibition The basement level exhibition was American Beauty: Aesthetics and Innovation in Fashion, which closed April 10, unfortunately. It took a geometric approach to fashion, and grouped innovative clothing according to the shapes that were used to create them, such as circles, parallelograms, triangles, etc. The clothes were not all beautiful per se, but they were interesting and innovative and it was fascinating to see how designers imposed these constraints on themselves and worked within them. I just love the basement space, as it is a single large room with a high ceiling and the museum does such an exquisite job of setting up the exhibitions.

Delman Shoe, FIT Exhibition The stealth winner in my book, though, was the exhibition of Delman shoes. Although the brand is still extant, I had never heard of it (shows where I shop!). I love shoes as much as the next girl, but because I place my highest priority on comfort (Danskos, baby) I don't always enjoy shoe exhibitions because they generally focus on the highest, most unwearable shoes ever created by men who will never wear them. This exhibit was sensational! The shoes were generally dressy and had a heel but they weren't inaccessible to the normal woman. What I couldn't get over was how contemporary they were! I had no idea our shoe trends were as recycled as our clothing. Every time I thought I had spotted the contemporary shoe (surely that brightly printed wedge is from this year...) it would turn out to be from 1943. Unfortunately, I only just managed to catch the Delman exhibition, which closed April 3. They have some info on their website.

==============

Fabric Mart, 3-2010

Before I left for NYC, I had succumbed to Fabric Mart. I had been in love with the huge orange chrysanthemum print silk for a couple months and finally decided at $3.99 I couldn't pass it up. When I met up with Mikhaela, she mentioned that she had a hard time keeping the silk under control for her maternity dress. This surprised both of us as silk twill should be fairly easy to manage. When I received the fabric I understood why. Although it definitely has a twill weave, the weight and hand are like that of charmeuse. It's not going to be fun! I'm thinking Simplicity 2579 view B; a little vintagey, not too many pieces to break up the print, appropriate for a floaty silk.

The blue print seemed so familiar and appealing to me.... When I got it I realized that it's a bandana print writ large, which is kind of cute. I ordered it for Vogue 8633 after someone pointed out that it is meant to be made with a double knit (what? the crispness does not go with double knit) because Fabric Mart had it listed at 5% lycra. It's not particularly stretchy and unfortunately is a lighter weight than I expected--they say dress weight, I say more like blouse weight--but I'll give it a shot.

The orange stretch twill was $1/yd. When do you not need screaming orange stretch twill in stash? Heh. Actually, I will make a skirt out of it.

==============
A Sewn Wardrobe asks:
Are these a backlog of projects to post or have you been extra busy lately? I hope the former, as you're making me feel very unproductive!

I haven't necessarily been posting a backlog of projects lately, but I *have* pretty much been posting as I finish things, which is unusual. I usually have so much that there's no way I can keep up! I have been so busy lately and have not had my usual amount of time to sew. I was hoping this weekend would be all me, but of course it is slowly being eroded and nibbled away by obligations and commitments to the point where I'm down to just a few hours. :( I have so many sewing plans and I want to spend uninterrupted time pursuing them!

Arnysews asks of my self-collar wrap blouse:
Does the wrap stay closed or do you need to wear a cami underneath?

Part of the reason I love this pattern is that there is no gape at the wrap! So it doesn't need a cami. However, the silk georgette of the flutter sleeve version is semi-sheer so I should probably wear a cami under it if I'm going to be in bright sunlight.


I'm sorry I don't always get a chance to answer all questions. If you have a question that is not sewing related or not of general interest (such as a hotel recommendation), and you don't have a blog where I can contact you, please leave some contact information so that I can answer you privately!