Monday, August 24, 2009

Stashoholism Confessional: Tokyo Edition

The last stop on my trip to Asia was Tokyo. I have wanted to visit this city since I was a little girl and we learned about it in Social Studies (do they still have this?). It seemed a city with such a mix of tradition and modernism and a culture so completely new to me yet accessible to an outsider (to some degree) because of the tradition of politeness and hospitality.

I definitely ended up loving the city, though I was surprised by how hard it was. My stereotype of the Japanese as orderly and logical made me think the city would be laid out on a perfect grid and everything would be easy to find. But of course this was a silly preconception on my part. Tokyo is an ancient city that grew organically and in a different way than a Western city. The value is on knowing your neighbors and your neighborhood, not on creating an anonymous planned city. So, many of the streets don't have names, and the ones that do don't have signs, and the ones that do don't match up to your map. Street numbers are not sequential, but are based on when the building was built. But the subway system is excellent and for major sites signs inside the subway station tell you which exit to take and once you get outside you only need to scan the area and you'll usually spot what you're looking for.

Bunka Gakuen Costume Museum, Tokyo
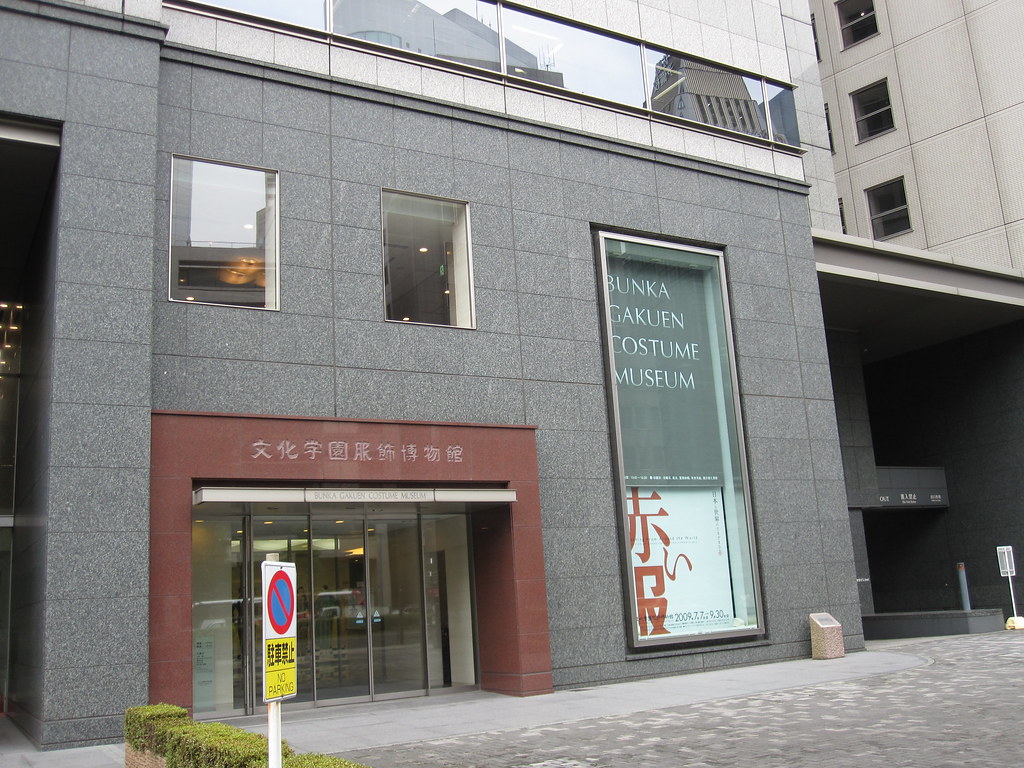
Lesser sites take more patience. I finally learned, on my last morning, the art of patience. You just have to accept that it will take you an hour to find whatever you're looking for, even if it is only a few blocks from the train station. (Of course, you can always take a cab, but to me that is cheating.) The Bunka Gakuen Costume Museum is about three or four blocks from the Shinjuku station, but it definitely took me a full hour to find it (this is the building it's in, if that helps). I will concede that partly this is because I have no sense of direction (and it was cloudy the whole time I was there).

However, I eventually found it. It is a small museum, somewhere along the lines of DC's Textile Museum. It doesn't display a permanent collection; rather, it is a series of special exhibits from its large collection. While I visited (and thank goodness there was an exhibition on after I finally found it!!!!) it was "Red Clothing From Around the World." Asia was heavily represented, of course, but there were also pieces from Africa, Europe, and the Americas. The focus was on traditional, but not necessarily historical, clothing--most of the pieces from Africa and the Americas were from the 1980s and showed how modern synthetic fabrics have been incorporated into traditional modes of dress. For the US, there was a piece from Halston and from Europe some Victorian pieces and a dress from Madame Gres. It was a good visit, and worth the hour it took to find.


Tokyo Fabric District Map


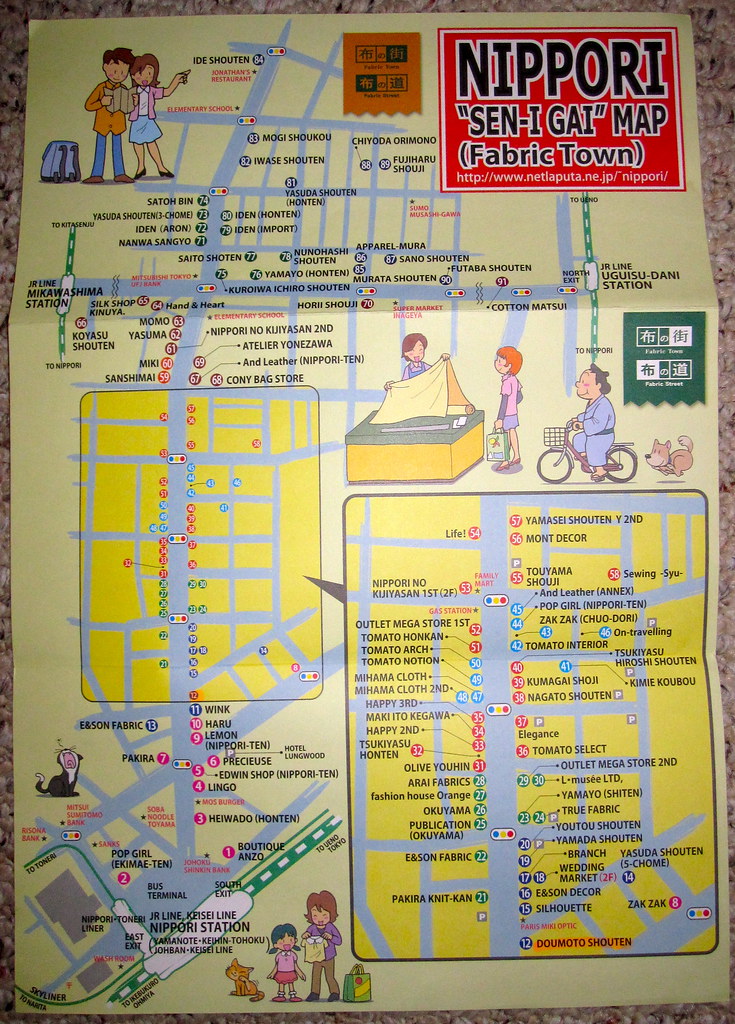
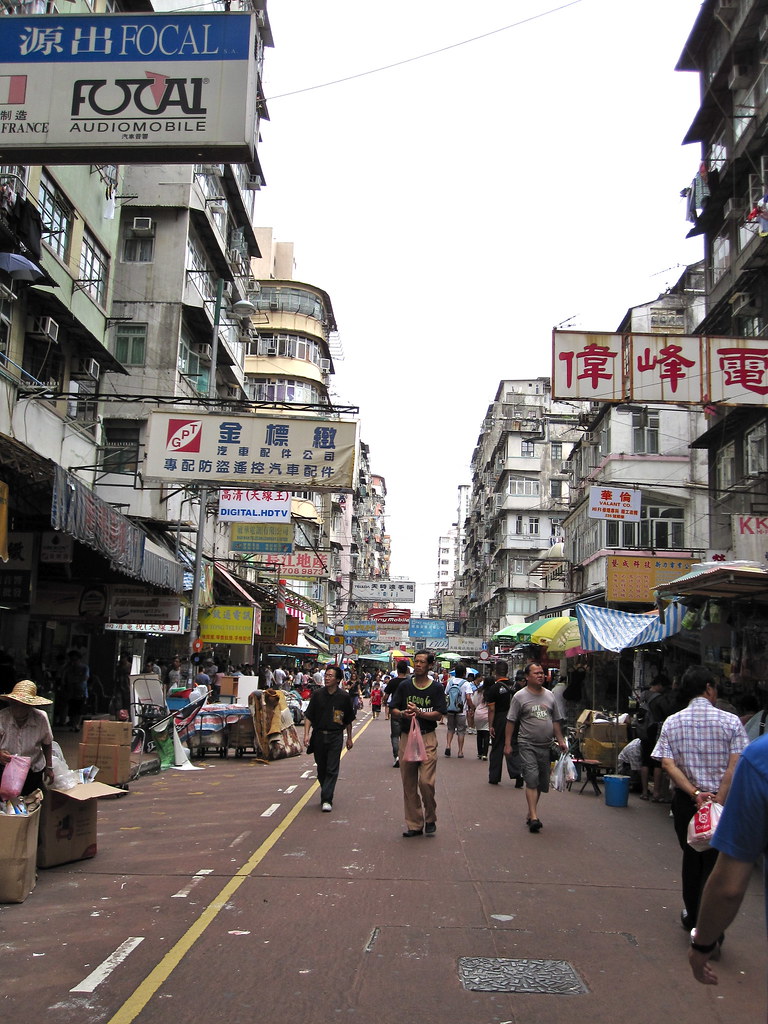
All right, I'm sure you're eager for me to get to the good stuff--my visit to the Nippori Fabric District. I didn't have to figure out how to find it, thank goodness. I met up with a friend of a friend who is an expat living and working in Tokyo (speaks *and* reads Japanese). All I can tell you is to take the Yamanote Line (it's a JR Line that circles the city) to Nippori Station, which is shown at the bottom of the map. The first fabric store we visited handed me the map at right. It is very cute and in English. If you find yourself heading to Japan, I'll see if I can PDF it and email it to you (not sure my scanner can handle odd sizes).


Tokyo Fabric District 
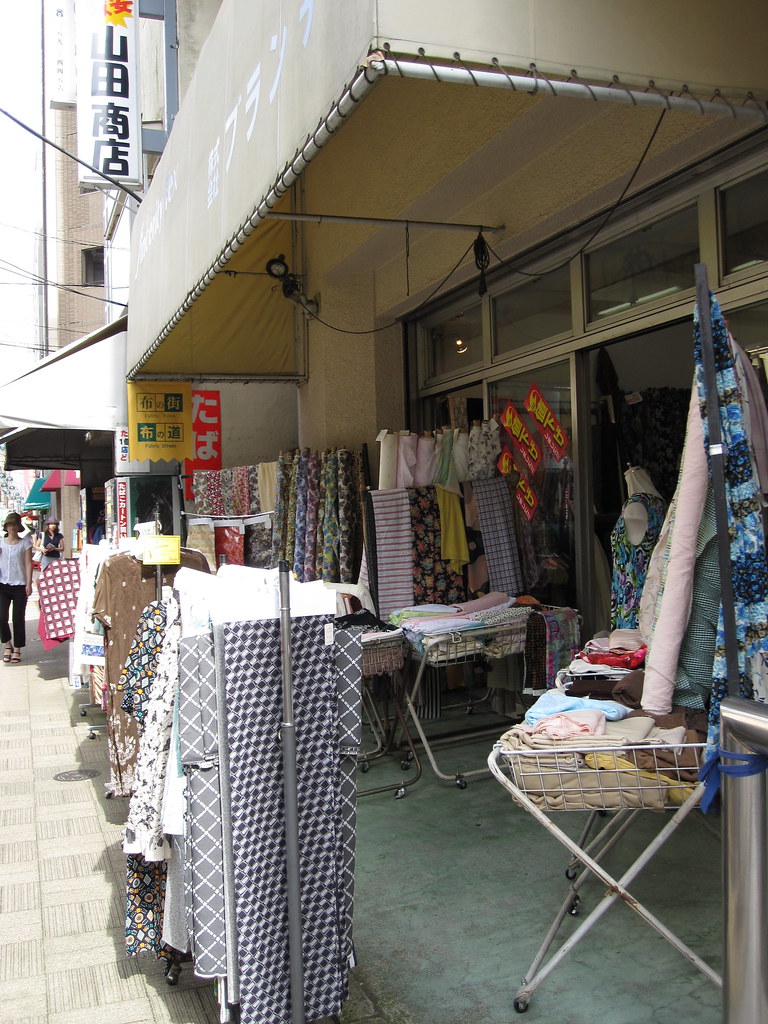
Once you're in the fabric district it's really easy for once--you just walk up and down the street in a straight line! I'm afraid at this point in my trip I was dazed and exhausted and only thought to take one picture while I was there (and none of me in Nippori, boo). The shops are, for the most part, little storefronts not too dissimilar to the NYC garment district. Tomato, of course, is an exception--three different stores and 7 floors of fabric. I would say in terms of selection it is a little less comprehensive than the NYC garment district or the Yen Chow Street Hawker Bazaar in Hong Kong. But this makes it a little easier on a very hot day when you are very tired.

There is a lot of cotton, which is what I ended up with. I didn't run into too much silk and virtually no knits. In Tomato there was a floor of special occasion fabric that had some jaw-dropping laces and other fancy fabrics. The prices were similarly jaw-dropping, but certainly no more than you would pay in the States for such fine fabrics. Cidell asked if there were so many adorable juvenile prints, but actually I didn't run across that many. Tomato has a floor of quilting cottons in lots of colorful prints, and some of those were in juvenile motifs, but mostly the garment fabrics were in more adult (or uni-lifecycle) prints.

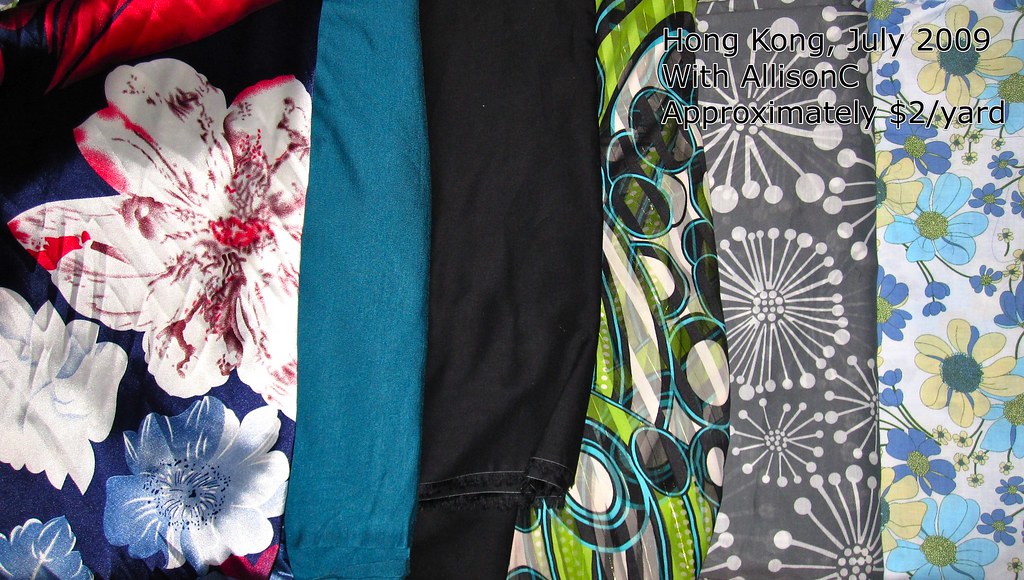
Knowing that my suitcase was already full to bursting, I restrained myself:


Tokyo 8-09

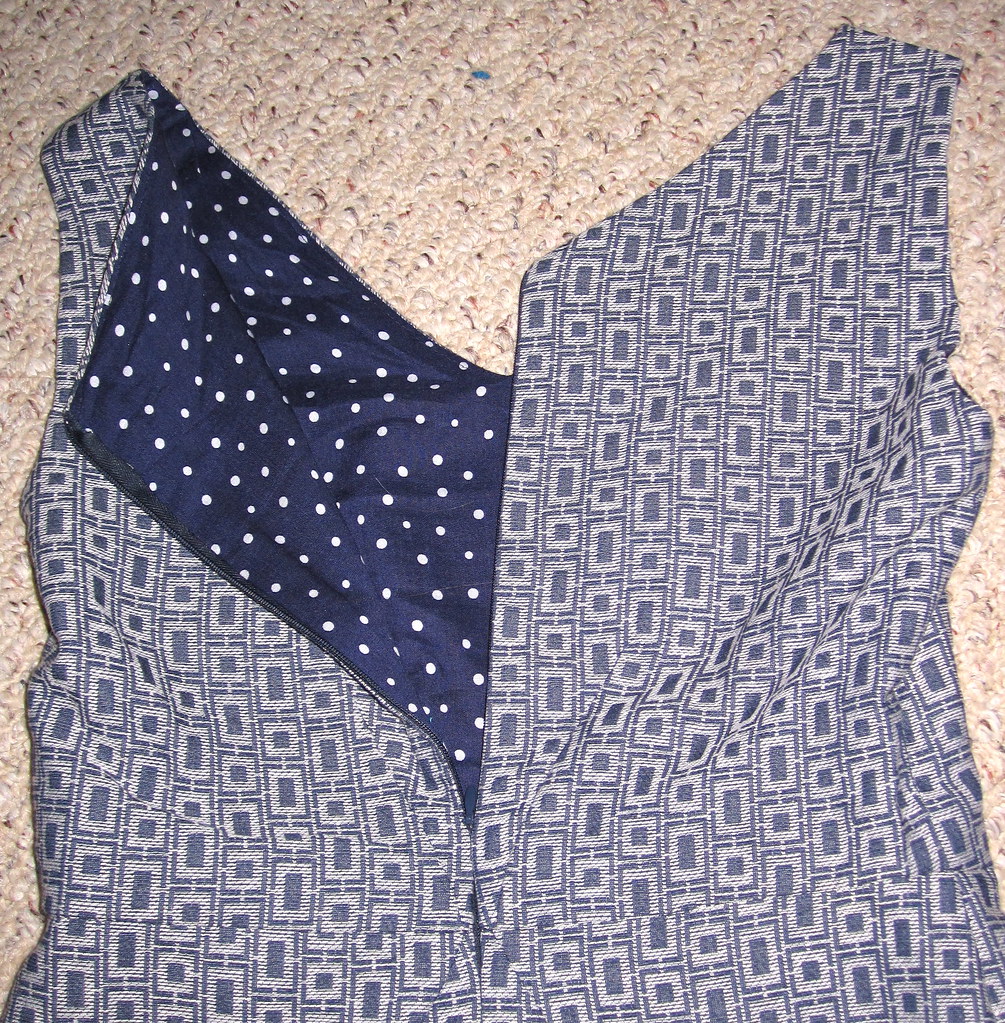
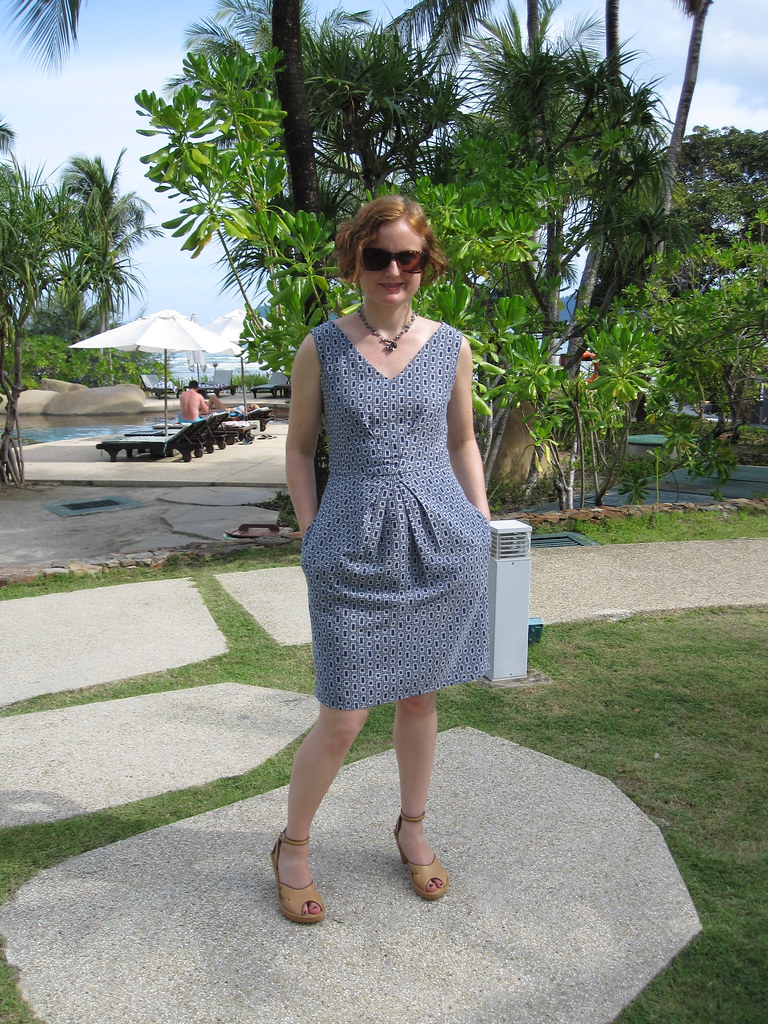
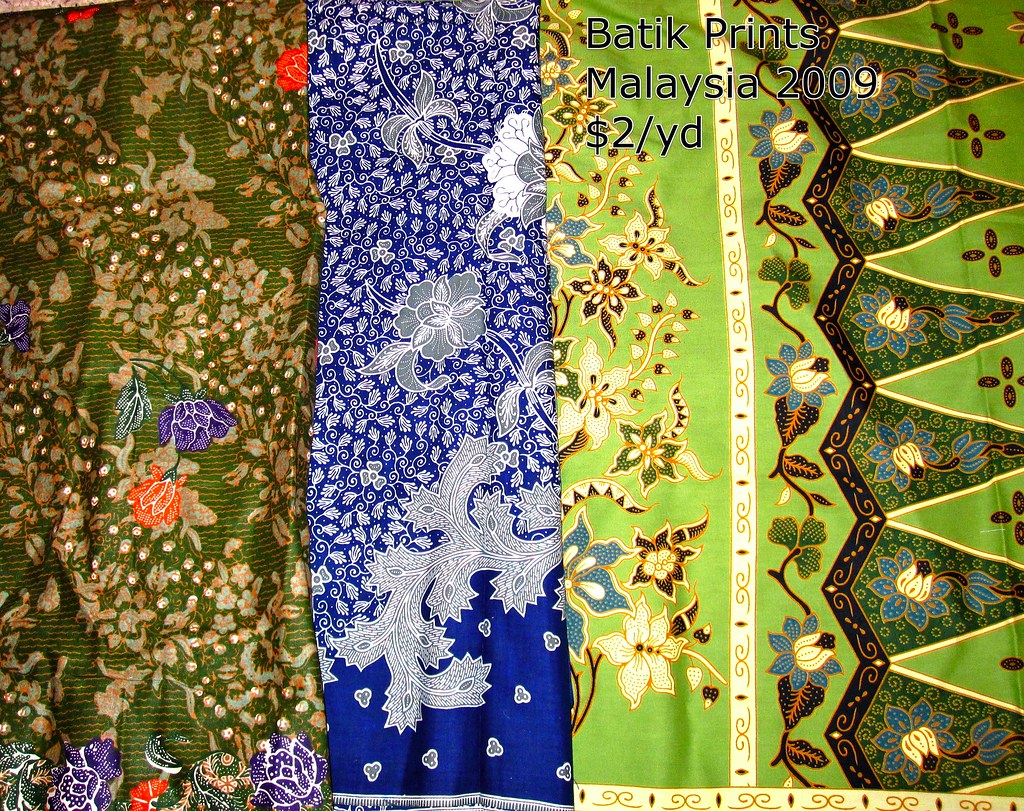
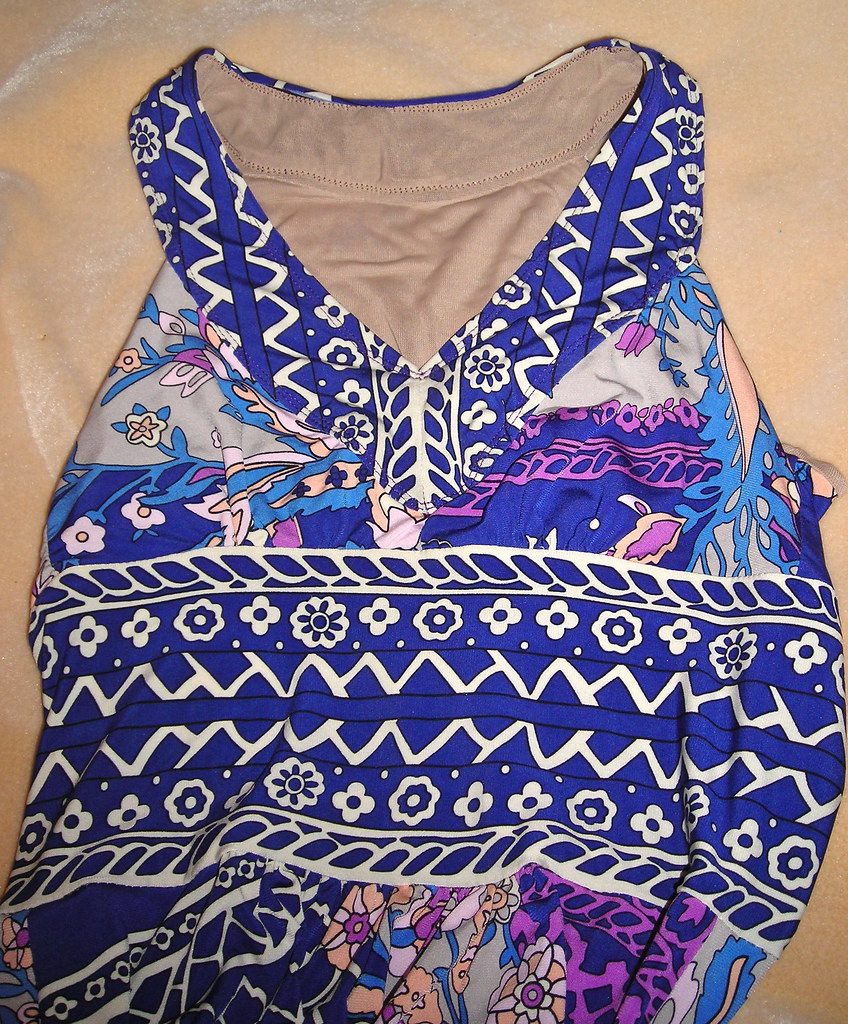
The print on the left is a heavyish textured cotton. I don't normally go in for ethnic motifs because it can be disrespectful (in my opinion) if not done well. But something about the print really spoke to me and it is already made up. The navy print was so Japanese I just had to get it! It is a heavy cotton and I am thinking it will be a great fall piece in Vogue 7693 (now out of print, apparently) with the straight skirt and a 3/4 sleeve with a cuff. The middle print I just had to have; it's a lightweight cotton lawn--very reminiscent of Liberty both in print and fabric. The selvage calls it "swiss cotton" made in Japan. I have no idea what that will be. Of course I want it to be a dress but I think it is too lightweight, so I have to find the perfect blouse pattern.


Of course, I had to make room for some Japanese publications!

Drape Drape and Mrs. Stylebooks

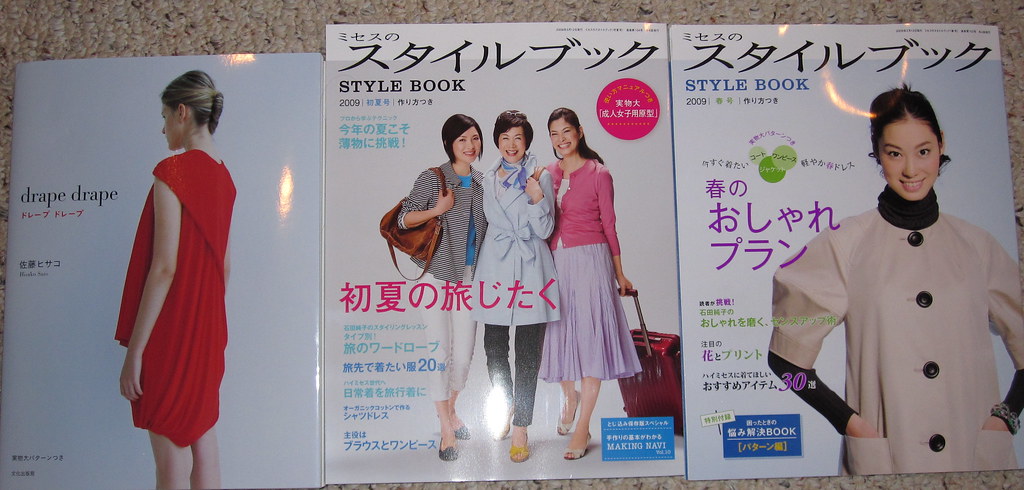
For these we visited Okadaya in Shinjuku, which has 7 floors of craft supplies, including a floor of books and magazines. Earlier in the trip I had visited Tokyu Hands on my own, another craft store that had come well-recommended. However, in the area of craft stores I will say that you don't need to feel too deprived if you can't get to Tokyo. The stores were very large and had a wide variety of goods; however, to me it was kind of like a Joann minus the crap but not plus much. I mean, it was nice not to see hideous faux-wooden, faux-folkcraft, faux-cheery holiday decorations, but I didn't see anything I wanted to buy, either. In Tokyu Hands I bought only a small notepad because I'd forgotten to bring one. At Okadaya I bought the book and magazines (well worth the trip!) but pretty much the only other thing was a random patch from the U.S. style patch section (!) that has my *very* unusual last name on it. It was so bizarre to run into that.

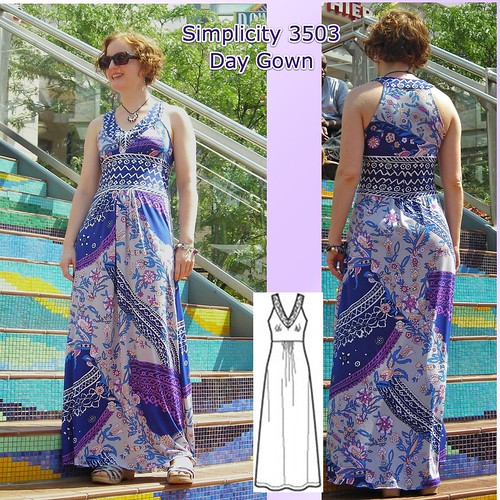
Anyway, the book has 17 patterns for drapey garments, one of which will be making an appearance soon as my birthday dress. It comes with complete patterns in four different sizes; the pattern sheets make BWOF seem like child's play and Patrones (harder than BWOF, I think) a breeze. I bought the Stylebooks in a fit of insanity. They're nice for inspiration, even if I will never sew anything from them since I don't know the first thing about rotating darts and all that.

I checked out Female magazine (whose corporate headquarters were near my hotel, I think; there was a building with posters for three magazines in the window, but it wasn't a shop). The styles were younger and simpler than in Stylebook and I didn't find it very interesting. So that was a consolation for not getting it here.

All my Tokyo photos (the ones I've edited, at least) are here.

============

So that was my trip! Very whirlwind, very fun, and lots of fabric!

Tuesday, August 18, 2009

Butterick 5321 Pleat Front Shift and Malaysia Stashoholism Confessional

For me it wouldn't be travel unless I stayed up super-late the night before finishing a project. My most recent trip to Asia was no exception, although I actually finished this little number in plenty of time the weekend before leaving (it was a bathing suit giving me a sleepless night). I love a shift dress with a jacket for professional speaking engagements--much more flattering, less stuffy, and more approachable than a suit.

B5321 Thumbnail

As I observed previously, Vogue 1025, an Anne Klein designer pattern, is almost identical to this one. It seems odd because Butterick and Vogue are the same company so it's competing with itself, but perhaps they are run separately and the right hand doesn't know what the left is doing. Or perhaps the Butterick was already drafted and in the catalog when Anne Klein handed in her pattern, and they couldn't exactly tell a top American designer her pattern was too unoriginal to accept. Or something. Anyway, I hesitated between the two, but ended up choosing Butterick 5321 because of the unusual diagonal darts in the back and the set-in rather than cut-on sleeves.

This was intended to be a muslin for the silk linen I bought a while back from Fabric Mart. I don't have a good solid black dress for either professional events or, not to be morbid, a funeral should one come up. When my dad had a health scare several months ago it occurred to me that I really ought to be prepared, because in a sad situation the last thing I want to think about is whether I have anything appropriate to wear and then have to go shopping or something. What a nightmare. Since the silk linen was expensive by my standards ($8.99/yd), I decided to practice on this $2.97/yard G Street polyester suiting first as a wearable muslin--a highly wearable one as it turns out!

Small Bust Adjustment My first pattern adjustment was, of course, a small bust adjustment. On the bodice front I reduced the pleat width and shortened the neck to shoulder edge by taking a tuck a couple inches below the shoulder. When I made it up it turned out I should have taken out just a little more of that distance; the photo here shows the new amount of tuck.

While sewing the dress, I found that the reduced pleat width was good, but the pleat needed to be closed up *much* higher than indicated. I sewed it up to just underneath the bust, so it is more of a released dart than a pleat, I suppose. It's much more flattering there--shapely, not baggy.

Swayback Adjustment I knew I would need a swayback adjustment as well, though I was a little concerned how it would affect the diagonal dart in the back. But, that's the point of a muslin, right? I just took a regular swayback tuck. Luckily, this didn't seem to create any problem with the pleat. I also shortened the skirt a touch.

Back I do like the diagonal darts. They're so unusual and they add a little interest to what is otherwise a plain back to this dress (though I do like that V back much more than a rounded back neckline). My only gripe is that the fabric ends up so thick there you either have to insert a regular zip (ugh) or fudge your invisible a bit by sewing further toward the edge of the tape (away from the teeth) and compensating by pressing the fabric over the zip. This imperfect solution frustrates me because I take pride in my invisible zip application. In retrospect, I think perhaps if I had trimmed the fabric from the darts I might have improved the situation, but again--that's the point of a muslin.


Lining This is a nice, simple pattern with four pattern pieces (front and back bodice and skirt), each of which is also cut out of lining. I hate facings and would have lined it anyway, so I'm glad Butterick was in my corner on this one. To ensure that the lining would not roll outward and show, I trimmed 1/4" off the neckline and armscye edges of the lining. This makes the lining slightly smaller than the fashion fabric, so it turns under and creates a nice finish.

It seems the Big Four have *finally* caught onto the all-machine method for sewing a lining to a sleeveless garment so the directions don't have you do any nonsense involving hand sewing the lining shoulder seams after everything is put together. Instead, you sew the shoulder seams of the fashion and lining fabrics (leaving the sides seams and back seam open), sew together at neckline and armscye, turn right side out through the strap tunnels, and then sew the side seams of the lining and fashion fabric at one go. I can't believe I did it the other way for so many years.

Since I love a surprise lining *and* I love shopping my stash for linings I pulled out this rayon challis from The Carol Collection. The rayon adds a layer of breathability to the polyester fashion fabric, but is still lightweight and drapey so it doesn't interfere with the lines.

Pockets!
I added pockets, based on the pattern for them from 07-2008-107. This has become my go-to pocket--the shape is good, the opening is large enough to fit your hand easily, but it's not ridiculously large. I don't expect to put anything more bulky into the pockets than business cards (or kleenex in a funeral dress), but there is something nifty about having them. Based on Butterick's method from the Maggy London pleated collar wrap dress Butterick 5320, I sewed the pockets on with a 3/8" seam. This magically causes them to turn under when the rest of the side seam is sewn with a 5/8" seam. It's a nifty little trick. I cut the front pocket out of the lining fabric, because I think the contrast is cute.

I love this dress. It's adorable but professional but comfortable.

Side viewHOWEVER, I am not totally sold on the style. The tummy-disguising front skirt pleats are what drew me to it. And they are tummy-disguising. However, they do their job a little too well and the skirt front is puffy and unattractive with a hint of Pregnant Chic when viewed from the side. But then again, seeing the pictures I'm wondering if everything else about it is cute enough to ignore that problem. How many people are going to view me only from the side? And do I care about their opinions?

But my goal for the silk linen is a classic dress I can keep at the back of the closet for many years (or at least as many years as it still fits!), and--while it has shown great staying power--I'm not sure that Pregnant Chic is here to stay. So I'm not yet committed to this pattern as my Reliable Black Dress (a different category than the Little Black Dress, to be sure), but it is still a contender.

All photos are here and the pattern review is here. Please excuse the indulgence of way too many photos of this one. The colleague I was traveling with also sews, so she understands the need for fashion shots, and we did photos all over the area. When you have a willing photographer *and* an exotic location it's hard to know when enough is enough!

=====================

Batiks from Malaysia 8-09

This review is an attempt to make up for the lack of any interesting travel information or stories about Malaysia. I was on the resort island of Langkawi, which is a lovely spot but resorts are not highly cultural. I was working all day anyway.

One evening we had a tour of the island, but unfortunately it was more in the nature of shopping tourism. I was excited that one of the stops was to be a market of local handicrafts, but this was then substituted with a trip to the mall. Yep, a mall. In the department store, I was happy to find these fabrics. They came in pre-packaged lengths of 2 and 3 meters. On some of the fabrics the edges were finished and perhaps the fabric could be used as a tablecloth, but some of them had raw edges, which makes me think they really were sold as fabric.

They were marked as "batik" from Indonesia, but based on my knowledge of batik these are actually prints in batik motifs. It was better than nothing!

I was really drawn to the blue and orange flowers on the dark green fabric. I actually hate the muddy, dark background color and knew at the time I was taking a risk. Either someday a project will leap out for this fabric or I will someday purge it from the stash. It would make a good tier for a tiered skirt, but the hippie/boho thing is not really my style, so I don't plan to make any tiered skirts. However, as the fabric was around $2/meter, I was ok with buying a "maybe someday" piece.

The blue is a little bit like a cuter, girlier bandanna print and I love it! It will be a perfect summer dress.

The light green has so much going on with different prints and motifs, and the colors are sensational. I have a vision for it and I can't believe I don't have a pattern!!! I want a dress with kimono sleeves, a crossover V neck in front, a low V back, a relaxed fit at the waist but with some shaping maybe with an elastic casing or a drawstring, and fullish, short skirt. This style is very popular and I assumed I would definitely have the exact thing in my stash.

I went through all my back issues of BWOF and my envelope patterns and nothing! I have several in that style, but they all have a separate midriff. I feel like, given the elements of the fabric, a midriff would need to have some kind of special print on it. My plan is to cut the bodice with the border along the neck edge, and to use the sawtooth pattern in the center of the skirt (another problem because to use that motif on the front and back skirts the waistline will have to be closer to natural than empire because the fabric is quite narrow). That doesn't leave anything special for a midriff.

BWOF has a couple of options with kimono sleeves, a slightly below empire drawstring/elastic, and relaxed skirt but none of them have crossover tops, they are all very low Vs that require a tank top underneath, and they require fabric flowier than cotton. All the options have high round back necks.

I could draft something but really, who has time? Of patterns I don't own, Simplicity 2642 is OK, but again has the high round back, and the fit is a little *too* relaxed. Butterick and McCall have nothing.

Well, enough rambling. My Tokyo report is still coming!

Thursday, August 13, 2009

Jumping on the Simplicity 3503 Maxi Dress Bandwagon

I still have two more fabric stops to show from my trip, but meanwhile here's a project I finished a few weeks ago.

S3503 Thumbnail

When I made a maxi dress last year I was very skeptical. Cidell practically forced me to do it, but when the dress was done I LOVED it. I get compliments on the street every time I wear it.

And yet, I still wasn't sold on the maxi dress concept. Sure, the woven version looked cute on me. I am seeing tons of knit maxis on the street, but I really didn't think it would work for me. Then I found the fabric for this dress on the $2.97/yd table at G Street. As I was getting it cut, the woman mentioned that they buy their fabric by the pound as mill ends and offcuts. This piece was an odd shape; one of the ends had a huge rectangle cut out of it. I'm guessing this was the last bit left after they'd cut RTW garments out of it. There wasn't much left, but I hoped it would be enough.

Cutting it out was challenging because not only was the length not quite enough but the width was seriously compromised. Running along one edge was the border print, about 6 inches wide. That's all right. But the selvages were ridiculous! They were huge white bands, 8 inches wide on one side and 6 inches wide on the other. So although the fabric was 60 inches wide, it actually only had (excluding the selvages and border print) 40 inches of useable width and a little under two yards of length.

I cut out the bodice of the main fabric and the cut the skirts as long as possible with what was left, thinking if it was too short I'd just hem it at the knee and have a regular dress. Luckily, it ended up long enough! I didn't hem the bottom, but this being an ITY type poly jersey it stretched a bit so I think I'll add a hem after all.

Front Bodice Detail

I took a small bust adjustment, as usual, on the front bodice by narrowing the gather length along the lower edge, and pulled the gathers closer to the center than indicated.

I cut out the edging/straps of the border print. I kind of wish I'd cut them the other direction (upside down). I didn't notice this until I took the pictures while wearing the dress, but the center front looks a little bit like a skeleton's ribcage and I think that looks a little weird going down my sternum. But I am probably the only person who will have that thought. At any rate, I actually took a lot of care to get that center seam perfect--hand basting, even--so I'll get over it.

Bodice Lining

I lined the bodice and midriff. To get a neat finish on the bodice/midriff lining seam, I sandwiched the bodice between the midriff and midriff lining and sewed them all at once. In considered doing a neat finish on the lower edge of the midriff, but decided this would probably be disposable fashion and just used the serger to finish it off instead. This looks nicer than I expected, so that turned out all right.

For the midriff, I wanted to use the border print so I ignored the pattern pieces and just cut it out the width of the print (which is about twice as wide as the original midriff piece). Instead of side seams, I did only a back seam, shaping it there. If you look closely at the back, you can see that despite my hand basting there the midriff doesn't line up perfectly, but oh well.

LoungingThe entire time I was sewing this, I was skeptical. I didn't think it would look good on me and would be totally stumpifying and figured I'd end up hemming it shorter. Once I finished, though, wow! I love it! A long dress feels soooo glamourous. I wore it two days in a row since I was seeing different people on those days. Heh. Once it's not blazing, searing hot, I'm sure it will be my go-to weekend piece. I don't know how people wear maxi dresses in the heat.

All photos are here and the pattern review is here.

Wednesday, August 12, 2009

Stashoholism Confessional: Hong Kong Edition

I had such a great time in Hong Kong with AllisonC! As soon as I arrived I hopped onto the ferry and met her and her husband for an amazing dinner at Watermark, a lovely restaurant on a pier with a view over the water. It was a lovely dinner and I really enjoyed relaxing after my long travels. Allison is just as charming as she seems from her blog and of course has an excellent sense of style! She was wearing her 02-2009-124 dress and it looked great on her! The color is perfect in person.

I think I had my camera but I was too topsy-turvy to remember to take any pictures. I headed back to my hotel exhausted but happy, and very excited about our fabric shopping the next day!

Sham Shui PoOn Friday we met up in the lobby and headed over to Sham Shui Po. Hong Kong has a good metro system--comparable in size and ease of navigation to DC's--as well as excellent buses so we had an easy time getting everywhere. Sham Shui Po is the general shopping area, where you can buy anything from food to toilets.

Allison and ButtonsThere is a sewing section in the area, although it was more about notions and supplies than fabrics. Here is Allison demonstrating a shop window for a button seller. Many of the sellers are wholesale only, so they just have sample cards and you place your large order. There was an amazing variety of buttons! We stopped into a store that sold jewels and I bought a couple different kinds of sew-on jewels. Not that I've used the ones I bought in NYC, but it never hurts to have a supply, right? Right?

Outside the fabric marketAfter browsing through all the trims, notions, and supplies in the area we were ready for the fabric! We headed to the "Hawker Bazaar," which is a mishmash of little stands under a rigged up tarp situation. It was hot, the aisles were narrow, and we were in fabric heaven! If you've visited Kashi at Metro Textiles in the New York garment district, picture that times about 20 stands. It was amazing. There was so much fabric. It mostly seemed to be mill ends, just as with Kashi and the other jobbers in NYC, so much of it was fashionable and current, straight out of ready-to-wear.

Trena and Allison

We threaded through all the aisles, making mental notes of which pieces we might want. Allison speaks enough Cantonese that once we had made our selections we had no trouble finding out the price and saying how much we wanted. Prices were insane! All the fabrics I got, including the silks, were under $3/yd. Alas, I was limited by how much room was available in my suitcase (not much) and knowing that I needed to pace myself, as I still had Malaysia and Tokyo to come. We left the Hawker Bazaar sufficiently loaded down!


Here's my haul:

Hong Kong 7-09

The stretch silk charmeuse on the left has HUGE red, white, and blue flowers. The scale of the print is suited to a maxi dress, but I'm not sure that's what I want. I have in mind a pattern that I swear is Simplicity but I can't find it anywhere (and can I mention that I don't love Simplicity's website redesign? Especially that they changed their link format so all the links I've made to their patterns over the years are now dead). It's a kimono/Duro style, with the front bodice crossed over in a surplice style rather than joined by binding in the Duro style (though there is optional binding along the edges), a separate midriff, full-ish skirt, and fabulous cape sleeves. It's in my stash, so even if it's OOP I'm covered. This would be an awesome 4th of July dress.

The turquoise knit is a good quality, and feels like rayon (haven't burned it yet). It's my favorite color and I love knits, so I'm not worried about it going to waste.

The black cotton batiste is to underline the sheer silk print. I hemmed and hawed over this one for quite a while. I don't like working with sheers; they *have* to be underlined and I find that annoying. But the colors are totally my colors and I eventually decided I had to have it. I love the sleeve from the 08-2009-118B blouse, but bitter experience has taught me that the sacky look in blouses is not for me, so I don't know. I'll find something, though. I'm thinking a flowy blouse tucked into a high waisted black pencil skirt, or even a shirtdress of that nature.

The gray snowflake print cotton is so soft and I just love the graphic print. There are a couple dresses in Burda's recent issues, 06-2009-128 and 05-2009-122, that I'm considering.

I bought the floral print for vintage 40s shirtdress the Myra sent me. However, later in the trip I found an even better fabric for that project so now I have this floral just waiting the next time I want a vintage-y sundress.

All my photos are here! There are more touristy photos to come, but rather than wait to edit everything I figured you all might want to share in my adventure sooner rather than later.